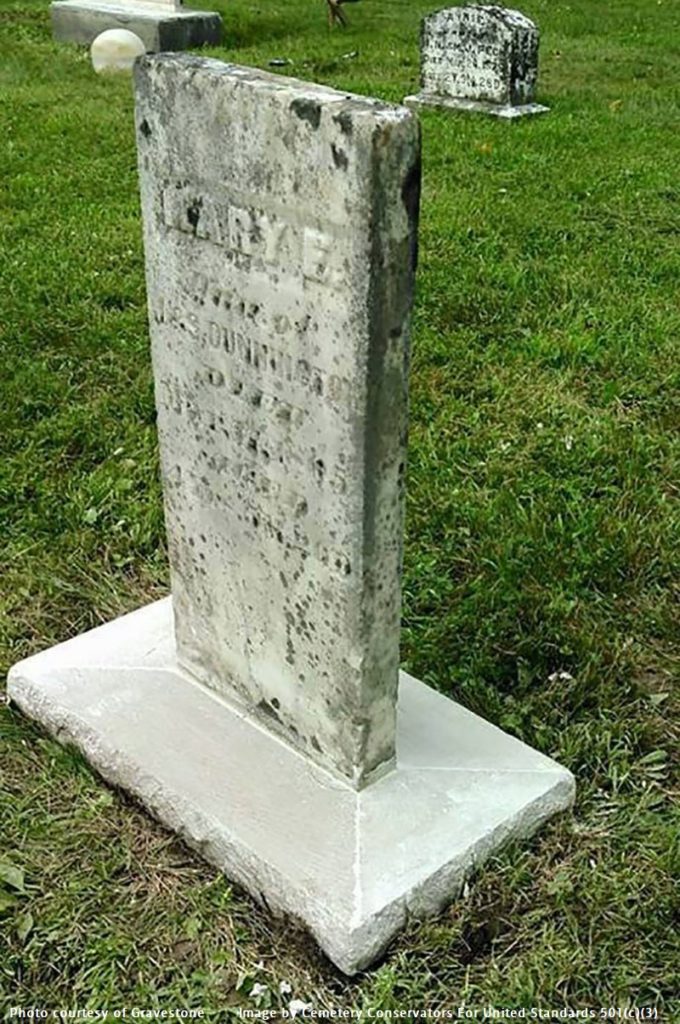
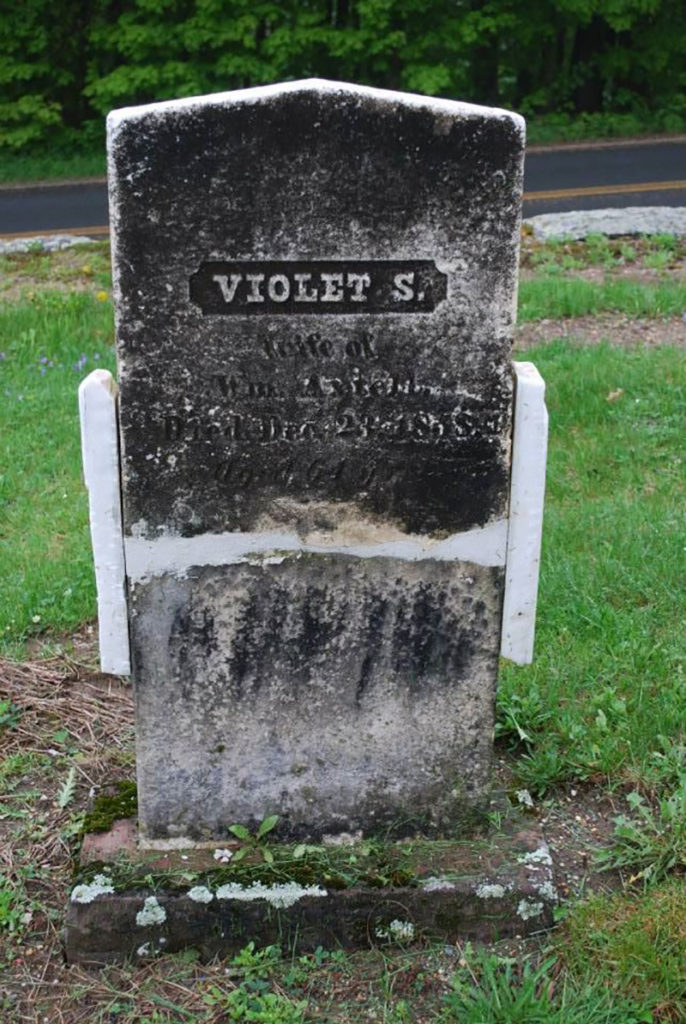
Tablet type stones in slotted bases are one of the most common types of monument you will encounter. These bases were made from a variety of quarried stone types, often central to the area of the cemetery. Bases are generally rectangular rough cut blocks with hand chiseled slots to accommodate a tablet style stone. The inscribed grave marker was then mortared into this slot. When this mortar wears away and the stone becomes loose, it then becomes necessary to re-mortar it back into place. At this juncture it is now important to understand historic lime mortars. Why lime mortar and not a modern concrete mortar? Lime mortars are durable, yet much softer than modern mortars found at local building supply stores. It is very important to use a lime mortar for this reason. Modern mortars are too hard for older softer grave markers made of marble, sandstone and the like. These harder mortars and concretes will do much more harm than good. The softer lime mortar acts as an adhesive and a buffer between the tombstone and base. This section below will walk you through the basics of how to accomplish this. You can also find a list of materials required under PRODUCTS USED…Mortars. And further information under TECHNICAL concerning MSDS.
The following is a great tutorial on mortaring tablets into slotted bases with a focus on the approved standard methods used in Oregon. We feel this is a great place to start when it comes to re-mortaring tablets into slotted bases. More on this procedure and mortar products that are widely accepted across the rest of the country, will be addressed below this article.
RESETTING HEADSTONES IN SLOTTED BASES
By CCUS member Lloyd Collins of Polk Cemetery Savers
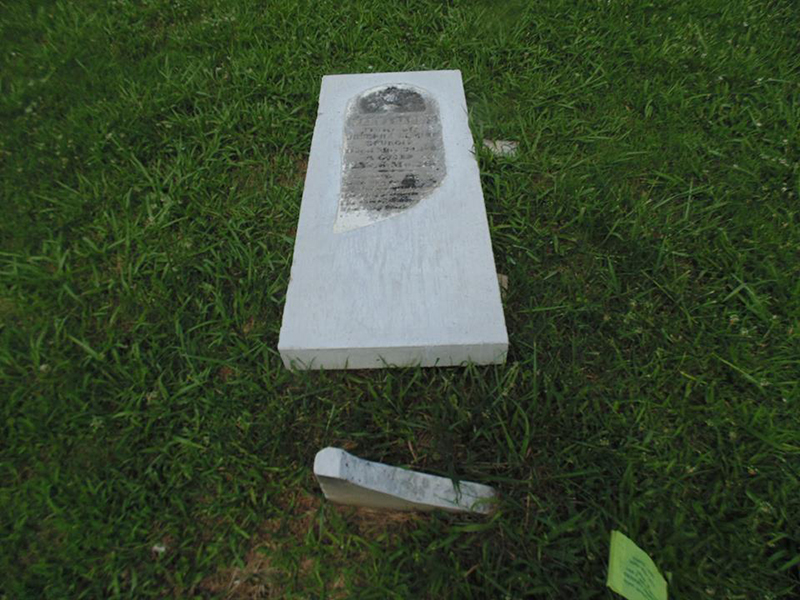
Headstones in most of the cemeteries across the country have either been set in the ground, in slotted bases, and some rare cases in concrete. Over time, the ground has shifted, rodents have burrowed under the bases, or animals, using them as scratch poles, have pushed the headstones off of vertical. Vandals have also caused damage by pushing the headstones over or breaking them in pieces. Whatever the reason, some of the headstones are no longer standing vertical. It is to the benefit of these headstones to be cleaned and reset so they stand vertical. The headstone can then shed water and breathe properly.
Slotted bases in cemeteries have been set above ground, half buried, or totally buried. The base may have been placed on an earth, gravel, or crushed rock bed. Inspection of the base should give you a good indication of how deep it should be buried. Depending of the severity of the climate, the base should be placed on a proper bed so the freezing weather will not push it out of the ground. The depth of the base should match the majority of the bases in the cemetery.
Over the years, headstones in slotted bases have been set with many types of material. A few include; dirt, clay, wood wedges, lead wedges, molten lead, mortar, lime, and some other materials harder to define. Some have been set with a very hard black material that chips off like Obsidian. See the section on materials to see CCUS preferred material to be used when resetting headstones.
PRECAUTIONS
Resetting headstones is a two person task at minimum. Always work with a partner.
As with any work done on headstones, the stone must be carefully inspected before any work is started. Headstones, even though they are made of stone, are very fragile. Over the years they may have developed damage from the environment. This damage could include delamination, stress cracks, and areas where water has infiltrated the stone and frozen causing larger cracks or broken areas.
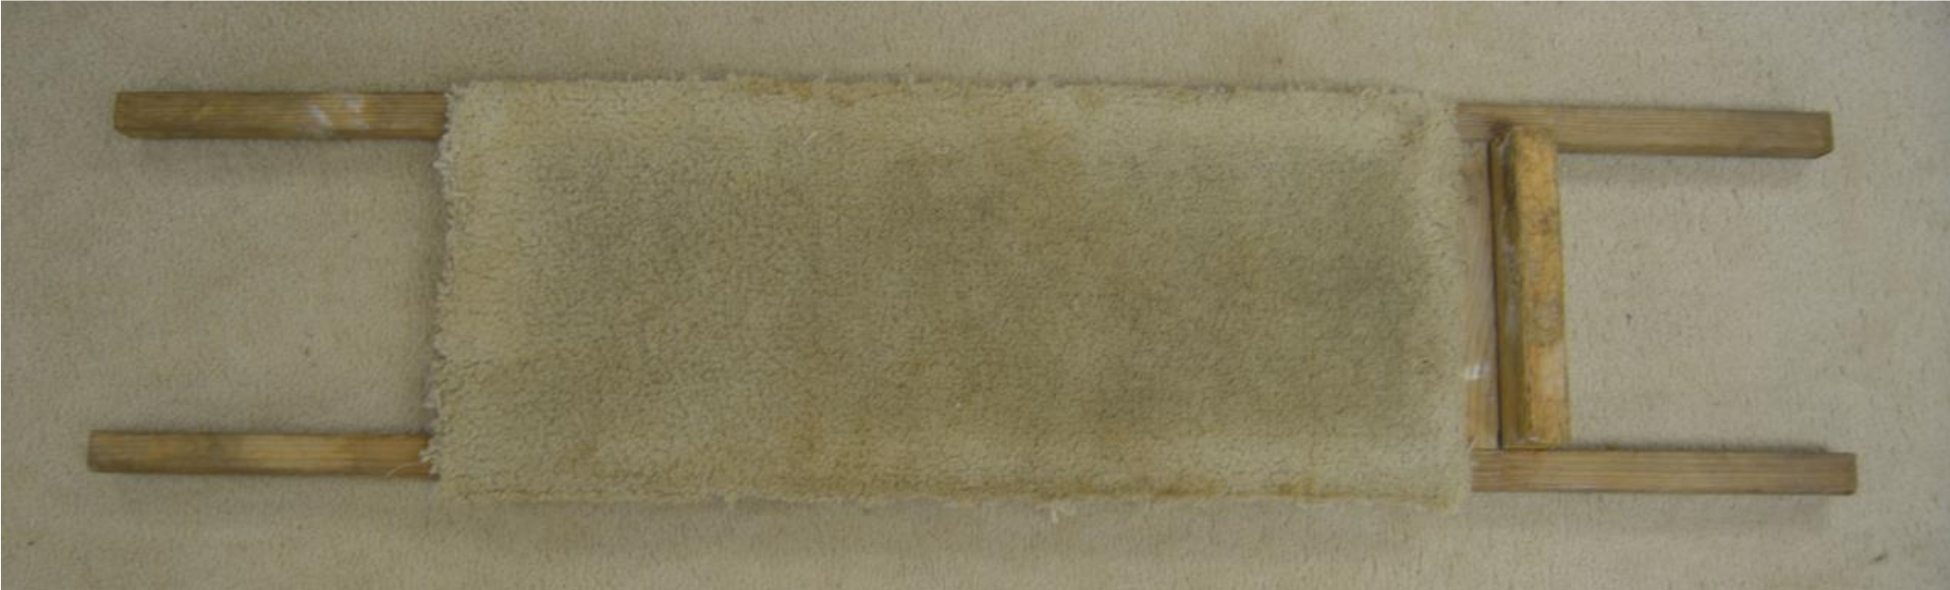
Before moving a headstone, ensure it is structurally supported to prevent any new damage. A supporting structure could be as simple as two pieces of wood strapped to the headstone. I have made a wooden platform that allows the headstone to lie on a carpet pad. The stone is loosely strapped to the platform and two people can lift and move the headstone without damage.
If the stone is broken, it should be cleaned and repaired before resetting it in the slotted base.
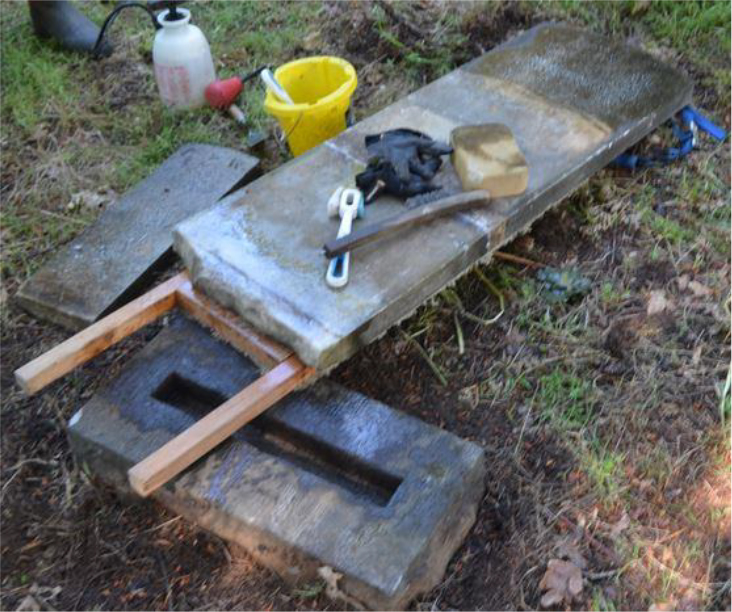
When moving a stone that has been lying on the ground ensure it is supported along its’ entire length as you lift it onto a flat surface for cleaning. Clean the headstone using the procedures and materials in CCUS Bulletin # (TBD). After cleaning one side, inspect for stress cracks and proceed carefully, turning the stone over, to clean the other side. After cleaning, if the stone is structurally sound, it can be reset into a slotted base.
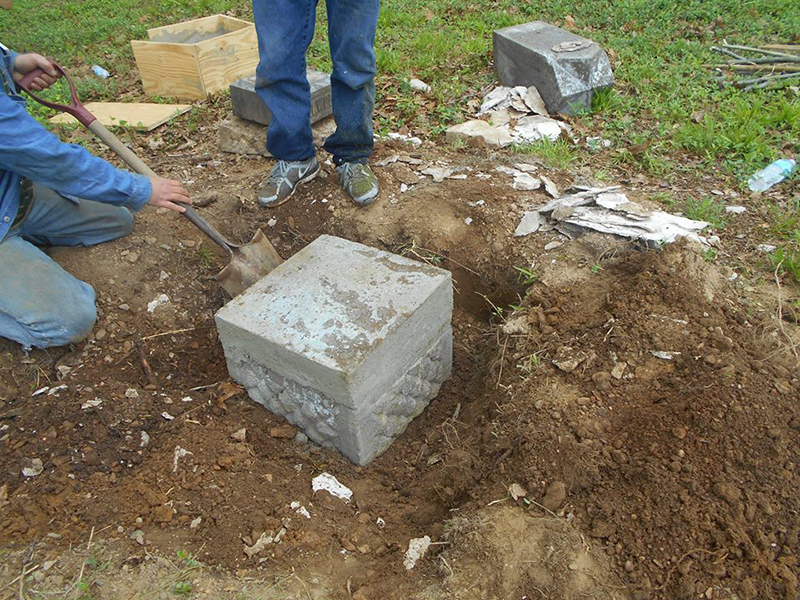
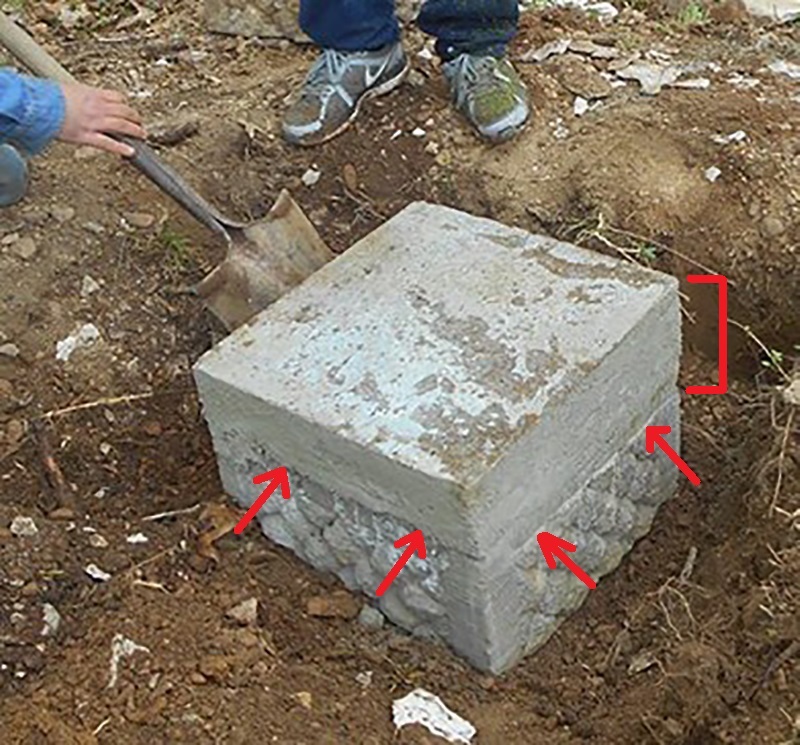
If there is a slotted base for the stone, inspect it for damage. Most original slotted bases are made from Sandstone or Limestone. You may find some made from Granite, and rarely, concrete. If the base is damaged, repair or replace it as necessary. See CCUS Bulletin # (TBD) for making slotted bases.
LEVELING THE BASE
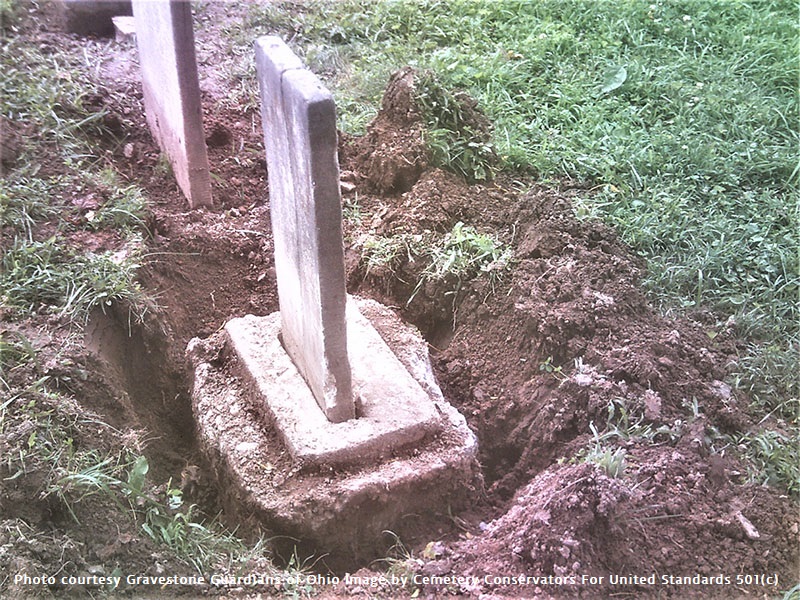
Excavate all four sides of the base. Save the grass on a separate tarp so it can be replaced after the work is done. Place the dirt on a tarp or other material. Determine what type of bed is under the base. If necessary, remove the base from the hole. Level the base by rearranging, removing, or adding material in the hole or under the base until the proper depth is reached. Compact the material under the base and ensure the base is level and aligned with the other markers. In some cases you may have to move the base a few inches to align it to a row. Some rows are not aligned. If this is the case, just square up the base to the grave site and/or leave it in its’ original location. Fill in the dirt around all sides, compacting it as you add dirt, until all dirt has been used. You may need extra dirt. Replace the grass and tamp it down to ensure a professionally left area around the base.
CLEANING THE SLOT
The slot may be filled with dirt, material from a previous setting, and broken parts of the headstone. If there are broken parts and they can be removed without further damage, they can be epoxied to the bottom of the headstone before resetting. If the setting material is hard you may have to use a hammer and chisel to carefully remove it from the slot. The setting material should be softer than the stone. Take your time and chip little pieces at a time. The edges of the base slot are also fragile. In some rare cases you may need to use a diamond saw to cut the edges of the material so it can be chiseled out. Be careful not to cut the base.
When the slot is cleaned, you can do a test fit of the headstone to ensure it has a solid fit. Carefully carry the headstone to the base. Ensure the bottom of the headstone is fairly square and fits into the slot without any gaps showing above the slot. If it wobbles you will need to remove pieces of the bottom or place pieces of lead or other material under the bottom of the stone until it is plumbed. I have found the use of lead fishing weights work well. They can be flattened as necessary to plumb the headstone.
RESETTING THE HEADSTONE
Now that all of the inspections and preparations are finished, you are ready to reset the headstone into its’ slotted base.
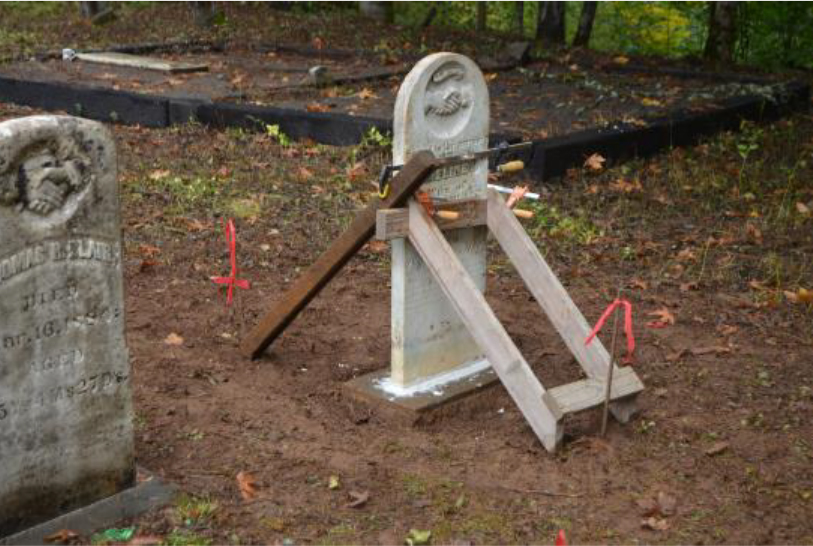
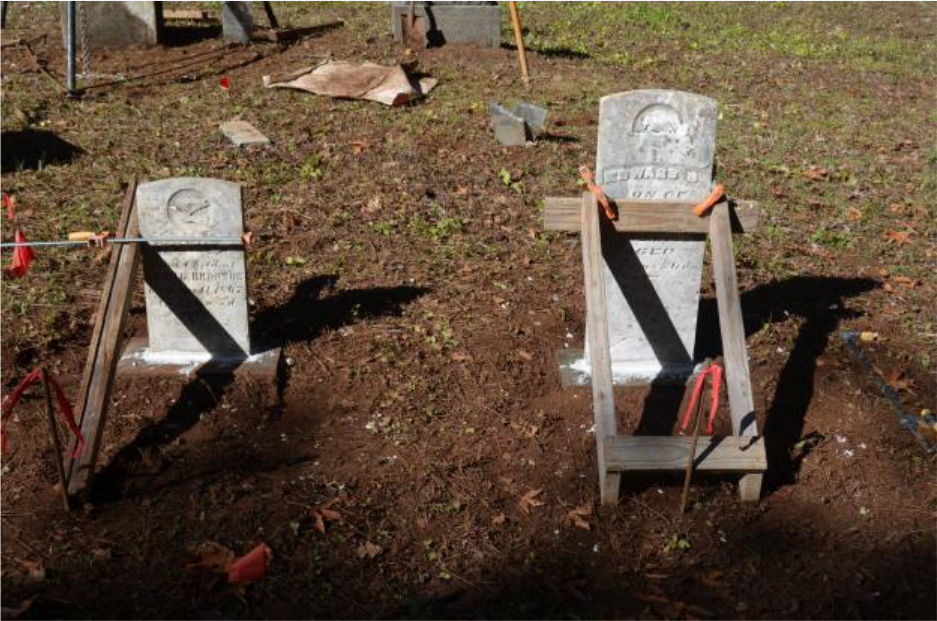
Carry the headstone to the base. Carefully place it into the slotted base and hold it upright in place while your partner attaches the wooden braces and clamps to the headstone. After the clamps are in place, ensure the headstone is plumb. Lift the headstone out of the slot and place it on the edge of the base or on pieces of wood. Keep the bottom of the headstone clean. Mix up the setting mortar. Ensure the leveling spacers have not moved from their location in the slot. Trowel in the setting mortar being careful to not move the leveling spacers. Ensure there are no holes in the mortar placed in the slot. Place enough mortar in the slot to ensure some is squeezed out around the bottom of the headstone when the headstone is placed into the slot.
Place the headstone into the slot. Press down on the headstone until it bottoms out in the slot. Adjust the wooden braces and clamps if necessary to plumb the headstone. Tighten all clamps and drive steel stakes at the end of the braces to keep them from moving. Check again to ensure the headstone is plumb. Remove excess mortar and use the putty knife to smooth the mortar and the pointing tool to make the final grooved finish in the mortar. Do not leave any areas that can fill with water. The finished joint should allow water to run off onto the base. Allow the mortar to set for at least two days. Check the mortar to ensure it has hardened sufficiently to allow the removal of the braces and clamps. If not, allow it to set another two days. After the mortar has set, carefully clean the excess off of the headstone and base. Do not damage the pointed joint.
RECOMMENDED TOOLS AND MATERIAL
Below is a list of possible tools you may need when resetting headstones:
WARNING! Most of the following lime products have a very high PH. (11 to 13) It is imperative you read the MSDS for the items on this material list and take adequate personal precautions when using them. Some cause skin damage, and breathing dust will cause lung irritation. These two are among other warnings listed on the MSDS.
The materials listed below are recommended by CCUS:
Follow the mixing instructions.
Natural Hydraulic Lime, 3.5 or 5, manufactured by Saint Astier®
Lime Mortar, 1 part lime to 3 parts washed, well graded, sharp sand
However, recommended material used to reset headstones varies by State and National Organizations. Check your State and/or local requirements for their list of setting materials.
For instance, the material shown below is specified for use in Oregon.
White Portland Cement with extra lime mix to soften cement can be used to set stone in recessed base.
1 part White Portland Cement (recommended: ASTM C-150. Type 1)
4 parts Hydrated Lime (recommended ASTM C-207, Type S)
8 parts clean sand
There is a commercial product available special ordered from Home Depot, that with added lime, closely matches Oregon’s’ recommendation. We have received permission to use this.
Quikrete White Glass Block Mortar Mix with 5 parts added hydrated lime. This type “S” mortar mixture consists of 2 parts White Portland Cement, 1 part lime and 9 parts sand. (12 parts) By adding the extra lime, the mixture is sufficiently weakened.
Mix ratio… add slightly less than1 cup of hydrated lime to two cups of the Quikrete mortar mix.
CLEANUP
After the mortar has cured, clean any excess left on the base and the headstone. Tidy up the area. Leave it as if no one had disturbed the ground around the headstone.
December 12, 2016 – CEMETERY CONSERVATORS FOR UNITED STANDARDS
As you can see there are several lime mortar based mortar mixes and recipes that can be used for slotted bases. Unless your state or area has some specific stipulation concerning a certain type of lime mortar that must be used, here is perhaps the easiest and most accessible lime mortar for this procedure. We recommend an NHL 3.5 for mortaring tablets into slotted bases, as mentioned above. We draw your attention to this again because we feel it the simplest way to go about using lime mortar.
When bought in pure lime bag form, you need only add a fine sharp grade sand to mix your mortar. For best results, we recommend the mix ratio be 1 part natural hydraulic lime to 2 parts sand. For example…1 cup natural hydraulic lime to 2 cups sand.
There are also readymade non-pigment lime mortars that already has fine sand mixed in.
You will find NHL 3.5 under PRODUCTS USED…Noncommercial Mortars, because it is a lime mortar product that requires the addition of sand to make ready to use as a mortar. You will find Ecological Mortar (F) under PRODUCTS USED…Commercial Mortars, because it is a readymade mortar with sand included.
Manufacturing A Slotted Base
Quite often when we wish to mortar in a tablet stone to its original base, we find the original base is beyond repair. Most original bases were quarried hand carved stone from around the local area near to the cemetery. Pioneers and early settlers utilized the stone that was native to their area for all new construction. Many times using the same size and type of stone blocks that were cut for building foundations, bridges, or retaining walls. Sometimes the blocks were left rough and merely slotted to accommodate the tablet stone. And other times the blocks were dressed with finished sides and top. There are many varieties of shapes and sizes to these slotted bases. And likewise, there are many varieties of stone used such as sandstone or limestone, depending on what stone type was prevalent to the area. And sometimes, what is known as “carver’s mistakes” left over from a building project were also slotted and used. As you will see in an example below. When it comes to examining these original bases, there is quite often no real rhyme or reason that dictates their size and shape. Some are massively big in comparison to the tablet they were carved to hold. And others seem insufficient in size and shape to hold a tablet in place and level for any period of time.
The following is a tutorial that presents several options concerning the manufacturing of slotted bases.
By CCUS members Mark Morton, Brad McGowan, Lloyd Collins, and Reggie Ross
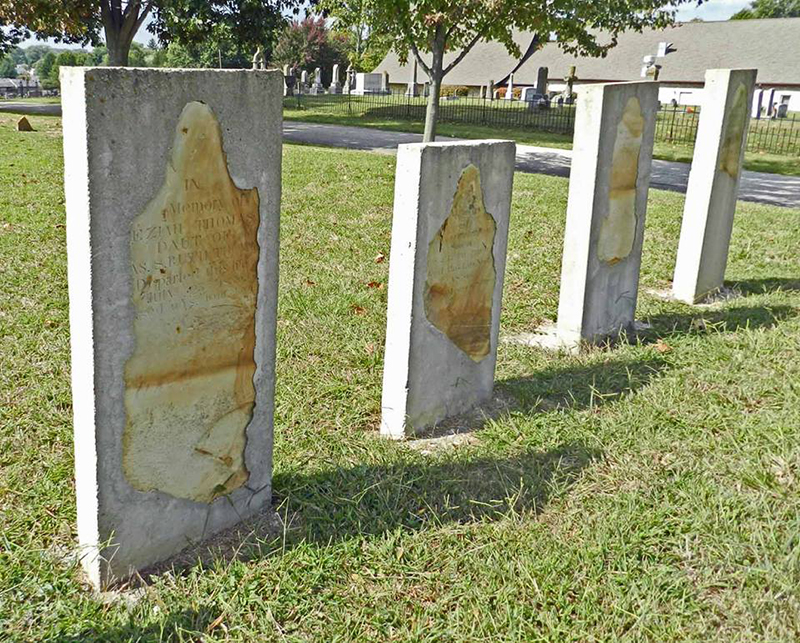
Here are some examples of original bases showing several different sizes and styles.
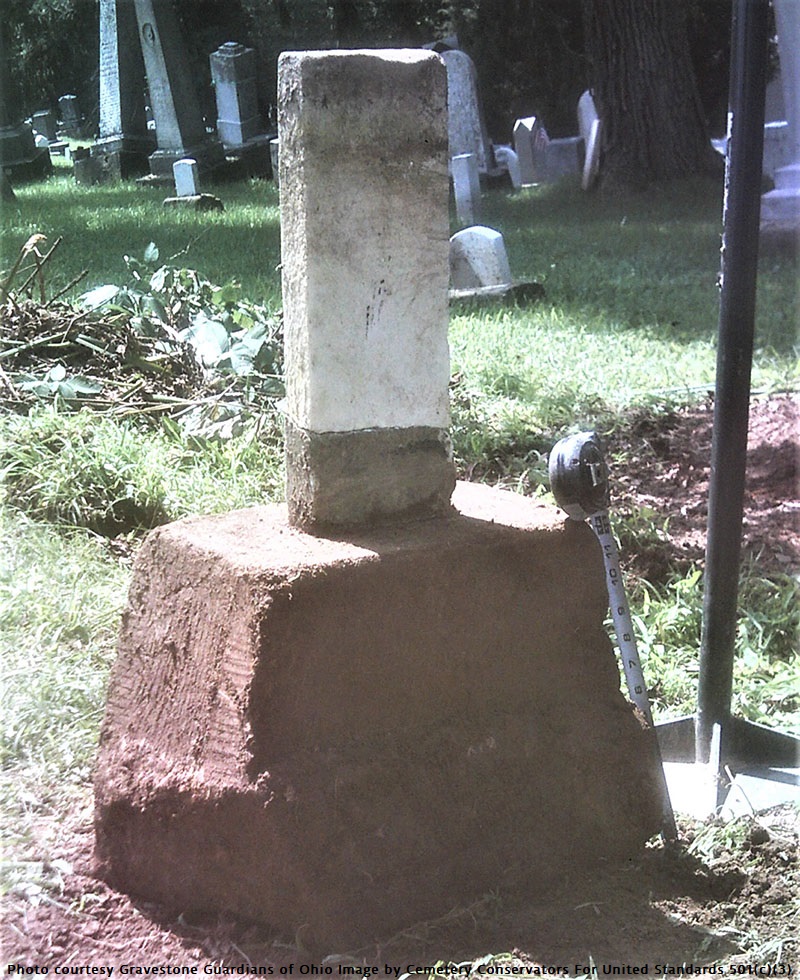
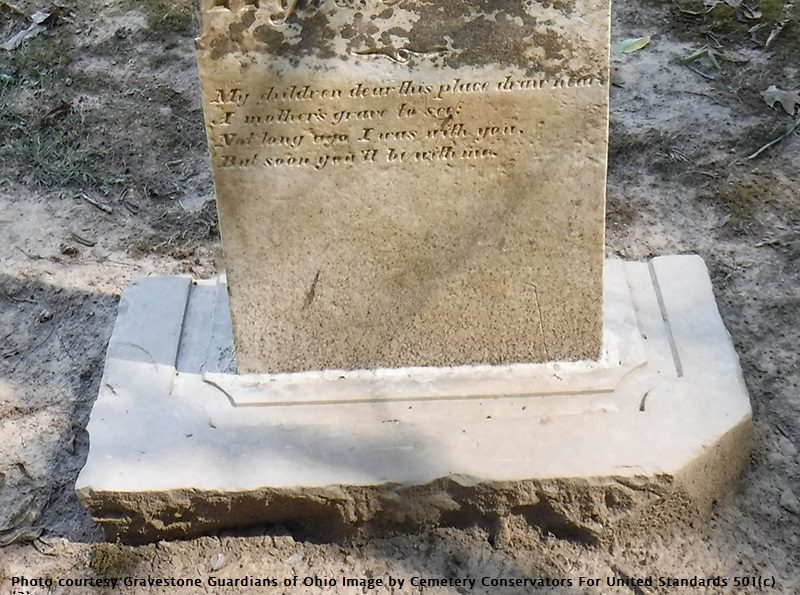
This base for a footstone is from Southeastern Ohio and is made of sandstone. It is a great example of a tapered block base which is quite prevalent to this part of Ohio from 1800 to the 1860’s. The base is massive for the small footstone it holds. The base measures at 1 ft. tall by roughly 17 inches long, and 11 inches across at the bottom, and weighs around 200 lbs. The footstone is 15 inches high and about 5 inches across and could easily be carried under 1 arm.
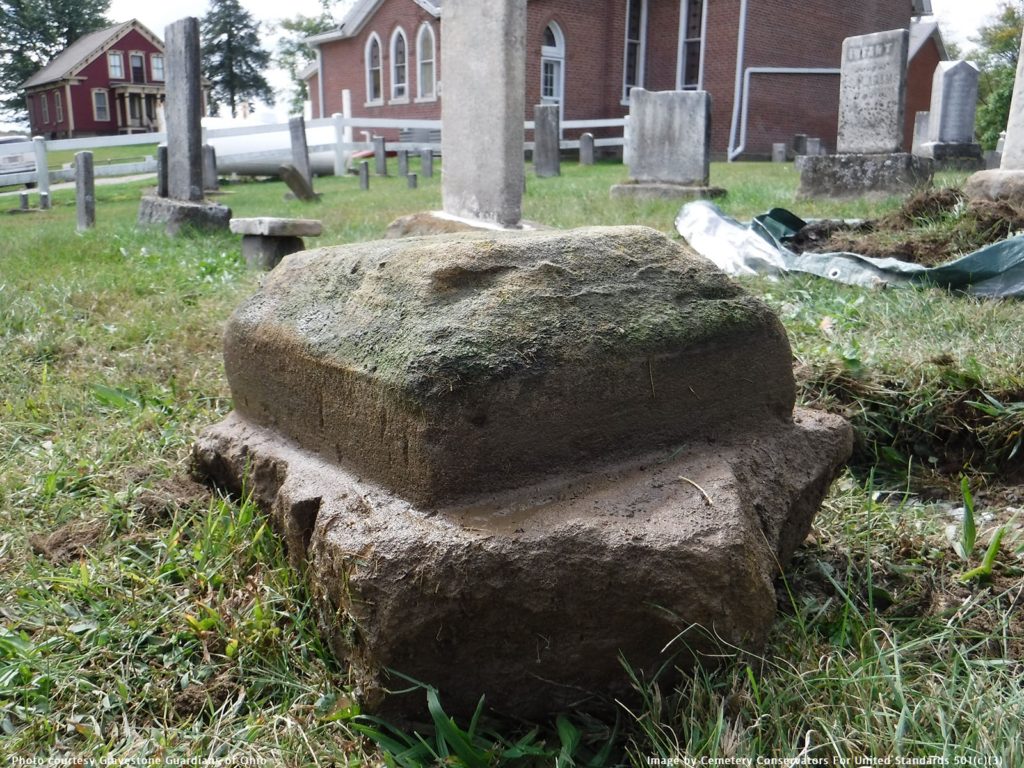
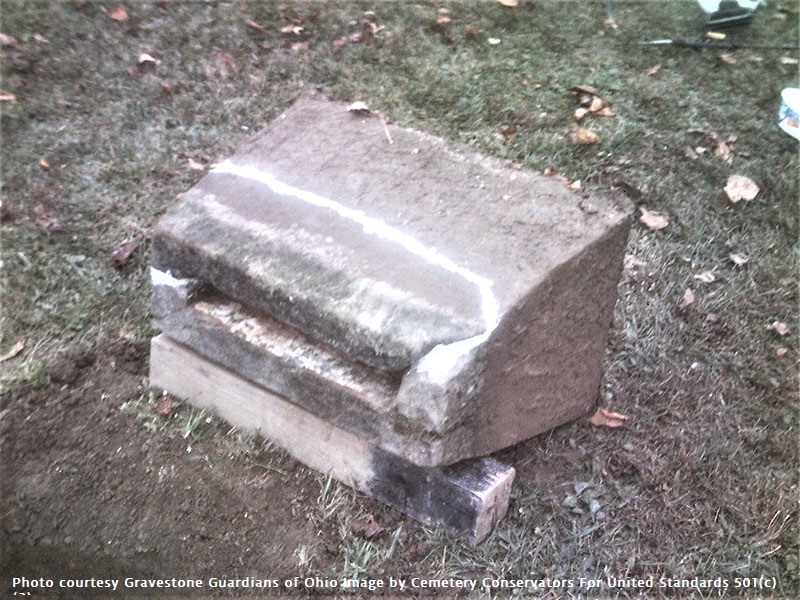
This is by far 1 of the most unusual base styles I have run across. It is from the same Southeastern Ohio cemetery as the footstone base pictured above. These are 2 different bases by the same carver. 1 is slightly more detailed than the other being the only difference. We seated all of these bases into the ground stopping at the point where the stone was dressed or finished. This is a good rule of thumb when setting any base that has this type of detail, if possible. The most important thing is that the base be seated deep enough so the stone does not topple. Some carvers got this balance point down very well, and others did not. Thus, sometimes you may have to set the base deeper than the cutoff point between finished and unfinished carving.
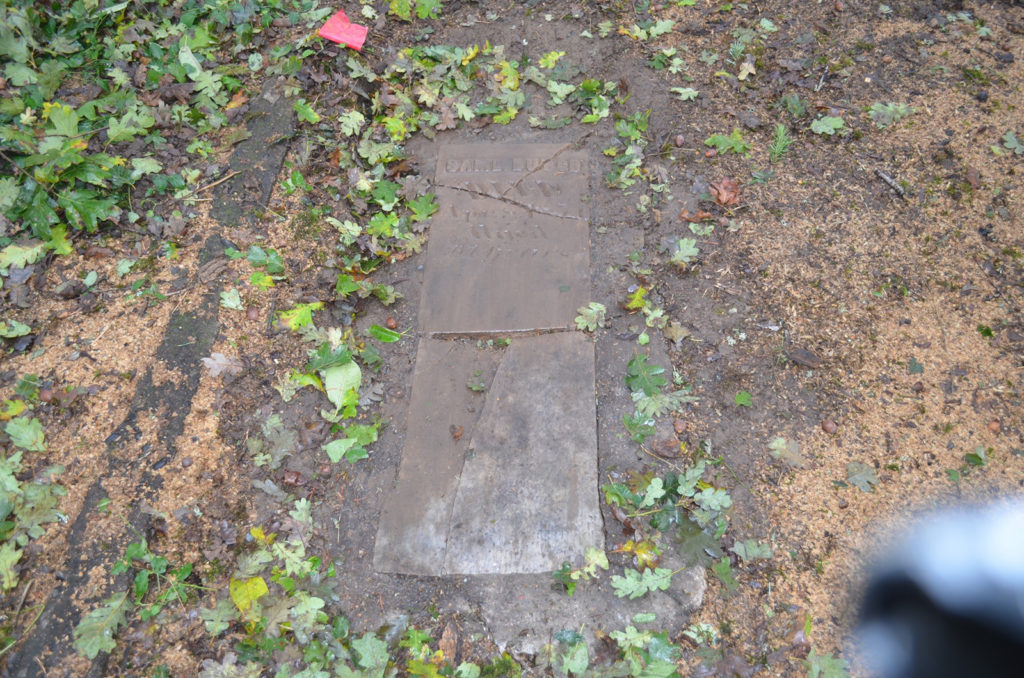
Here is an example of a “carver or stone masons mistake” as mentioned above. This stone has the appearance of once being slated for a building’s façade.
Repairing a broken slotted base can be a challenge at best. Many times they are shattered in lots of pieces making them impossible to reconnect with any durable strength. The sandstone base above was still very solid, with a clean break, and only a single break. Most original bases, if they are broken, break at the edge near the bottom of the carved slot. This is the weakest point of any slotted base. We put this 1 together with Casein Glue mortar because the clean single break really lent itself to trying this repair. It has been 4 years since this repair was made and the tablet mortared back in, and it is as solid as the day we put it together. This may not always hold true or be the case when it comes to trying to repair a base. Any repair made at the weakest point runs a risk of failure. This is just an example of a repair possibility and should only be attempted by someone with some experience that can best judge the particular situation.
Now let’s take a look at manufactured slotted bases. Let’s 1st start with a crude somewhat poorly made slotted base. The best and most important part of this construction was the making of a slot that allows the tablet to be mortared into place, instead of the much worse choice of placing it into wet concrete. But, it was a crude quickly made and poured concrete mix that will have a more limited lifespan. This particular base pour also has an uneven and lumpy bottom edge, making it very difficult to level. The goal is to always try to think about the longevity of any cemetery work performed. All such work will need some future maintenance at some point. So a stone with a rough lumpy bottom will make it much more difficult to relevel down the road. This can easily be remedied as you will see further down this page as we discus base molds.
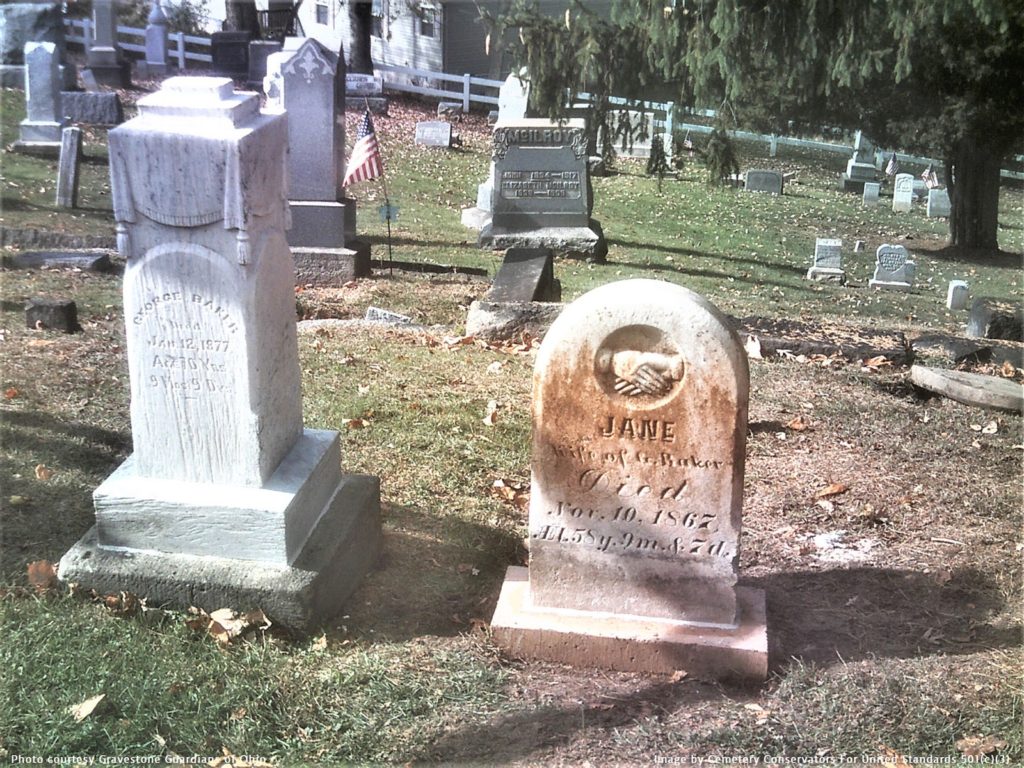
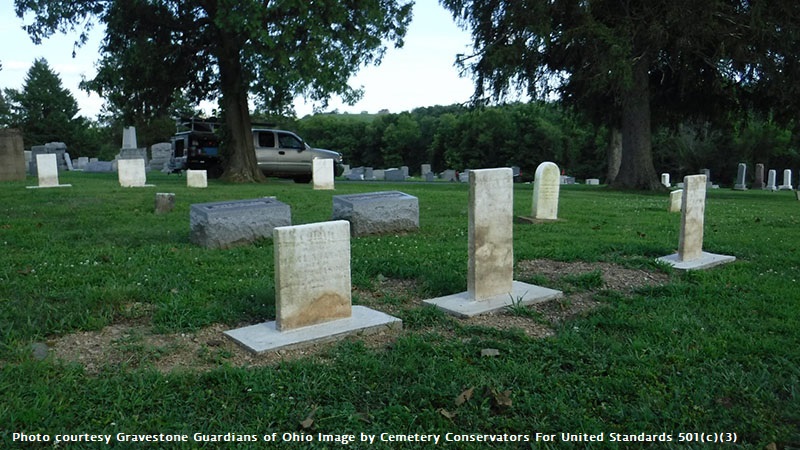
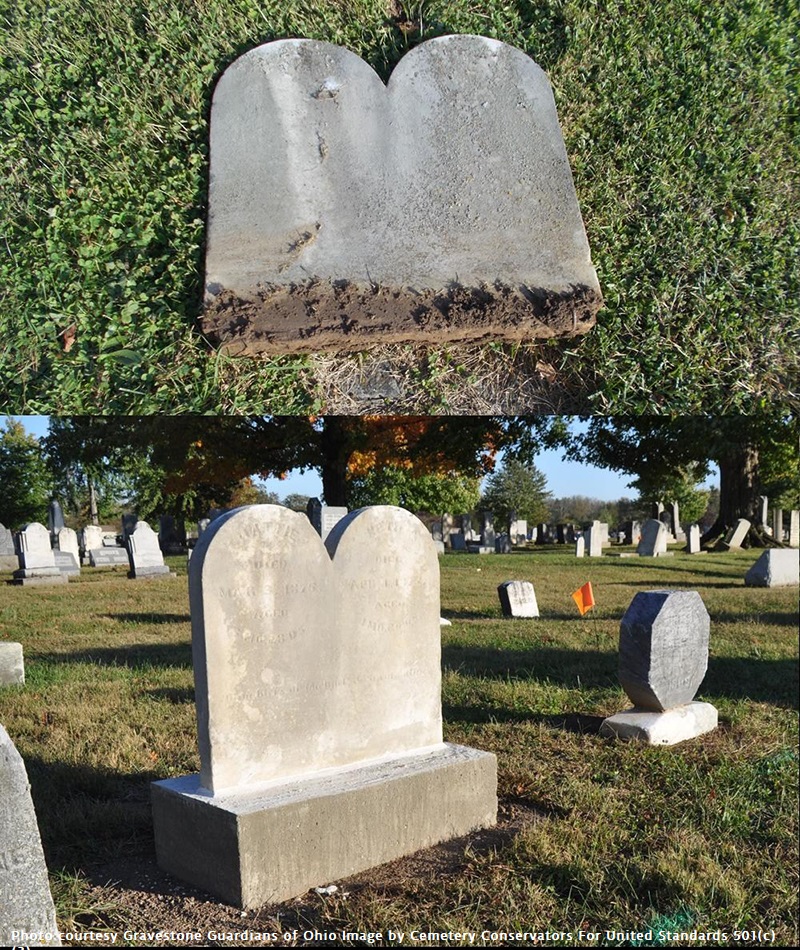
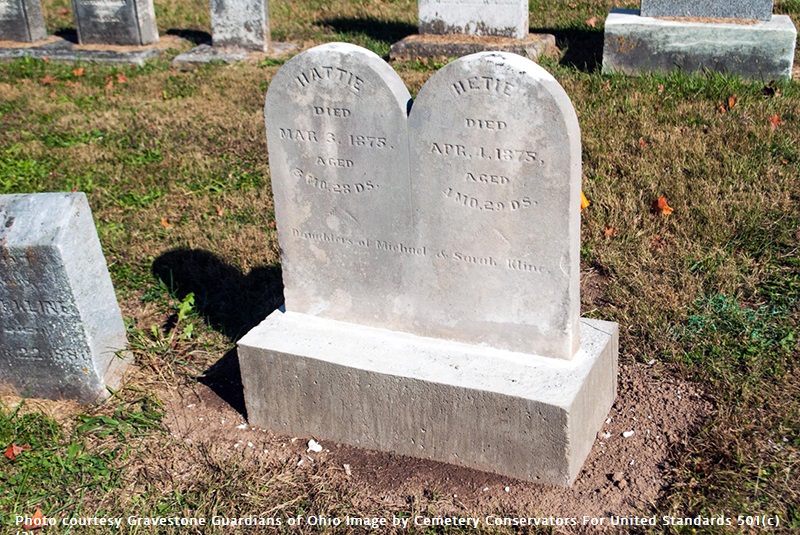
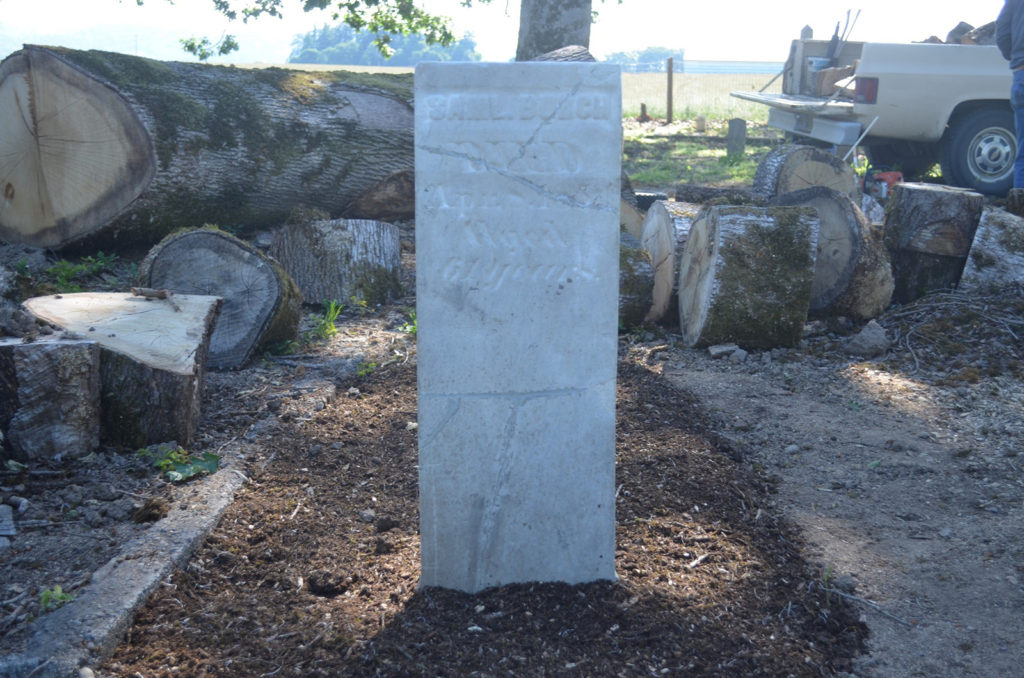
A new slotted base was needed for Jane Baker to complete the preservation of this couples plot. We cleaned, leveled and reset George Baker early in the season and took care of Jane at end of season. The orange coloring on her stone is because the D/2 biological cleaner is still at work. Today 4 years later, her stone is as white as her husbands is.
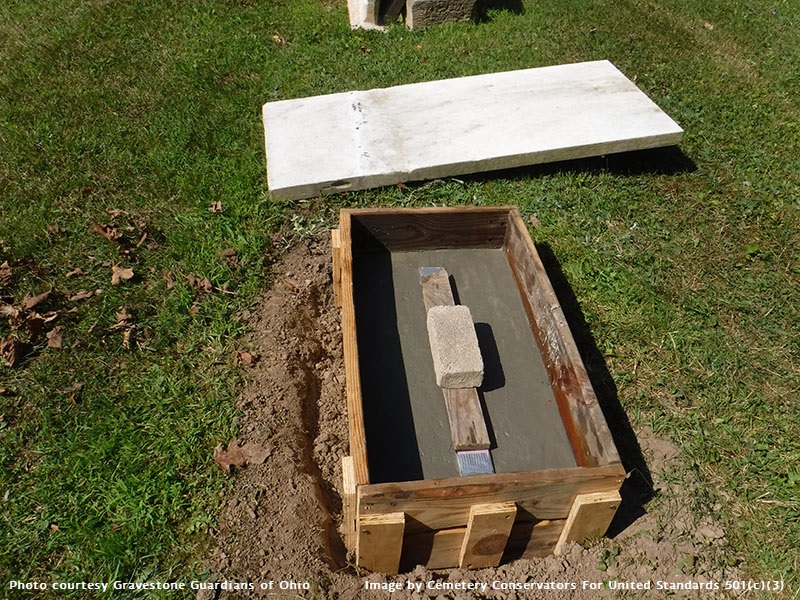
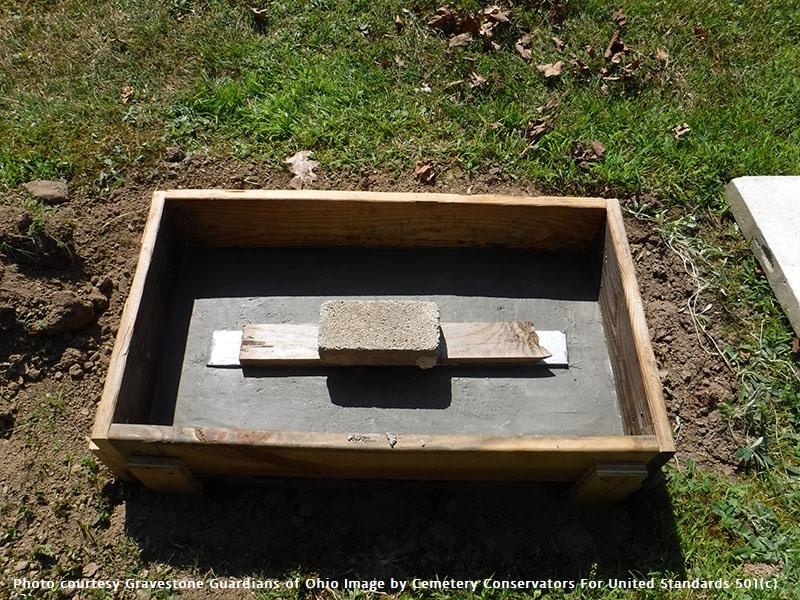
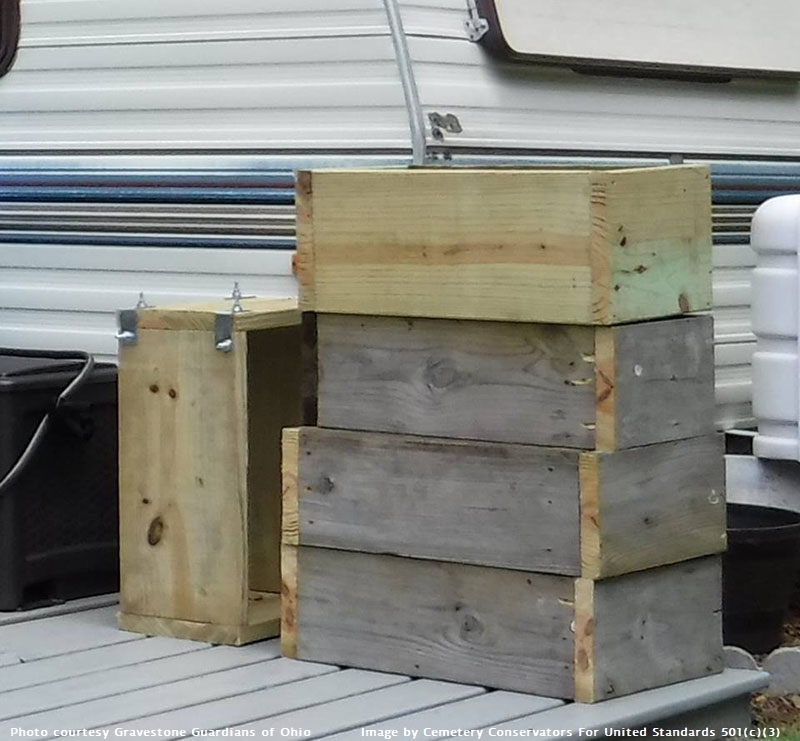
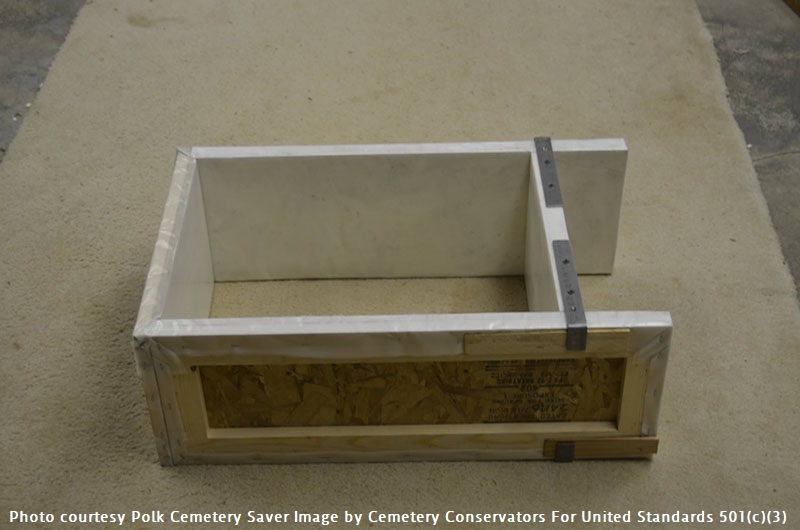
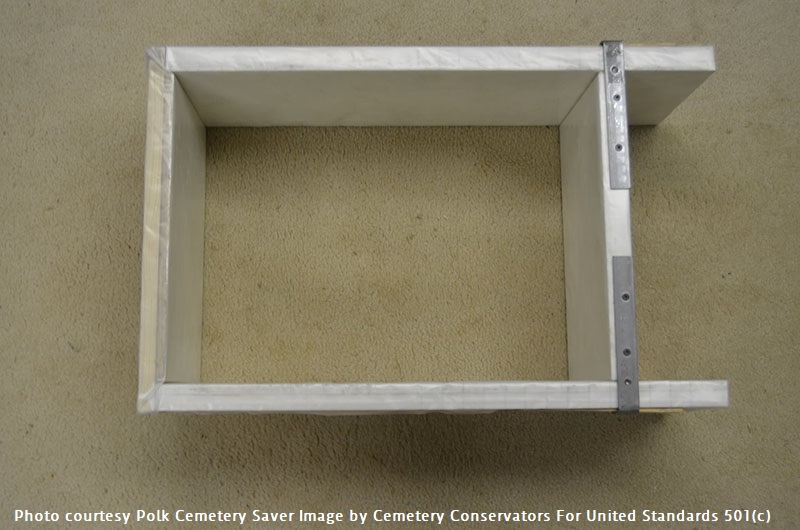
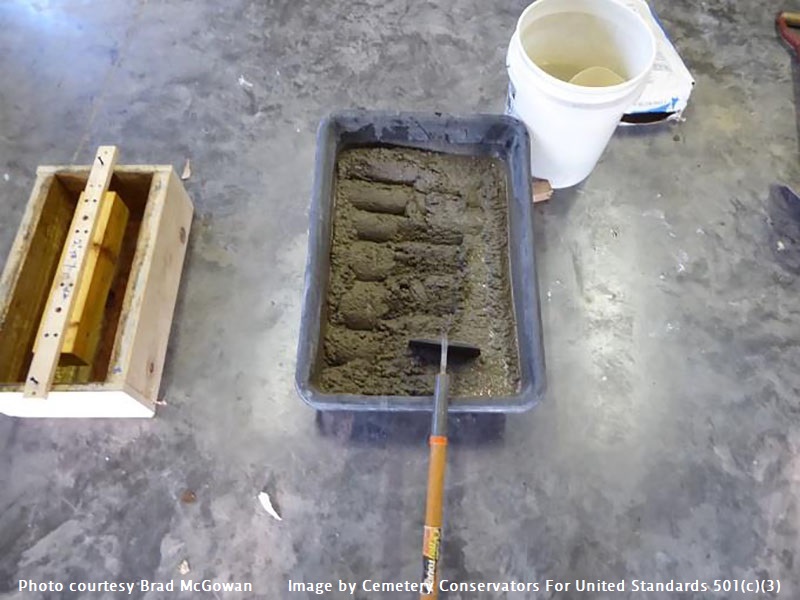
There are a number of ways to manufacture a slotted base. We’ll start with the simplest types of box molds that can be made from odd pieces of lumber. The box mold above was made with left over pieces of deck boards and scrap chunks of plywood to anchor the deck boards together and attach the sides to each other. What you see in the middle beneath the wood board and brick, is a piece of pink insulation foam board, cut to a slot size that will accommodate the tablet stone. This base was for a large tall marble tablet and thus required a large mold. This mold was approximately 30 inches long X 16 inches wide, and held 3 – 80 lb. bags of concrete equaling 240 lbs. total. The finished base height was approximately 1 ft. We’ll address height and width of box and amount of concrete used in accordance with size of tablet at the end of this section.
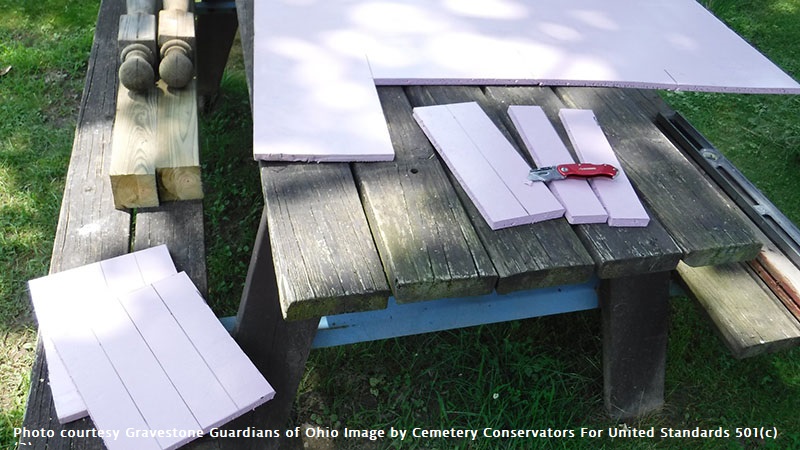
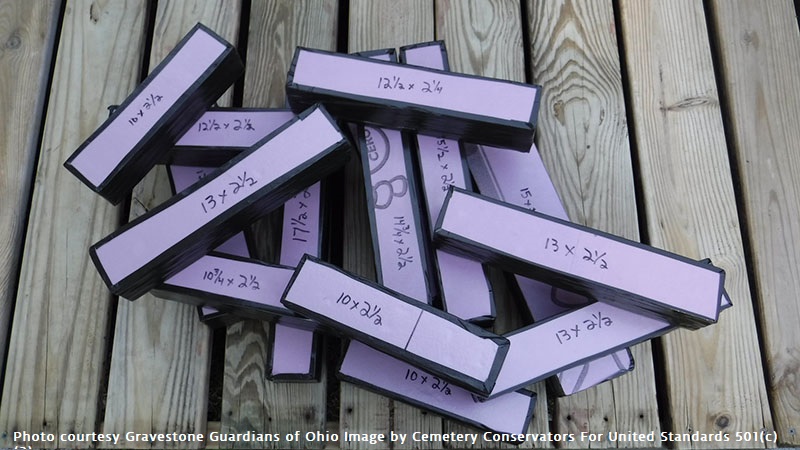
When it comes to making the mold for the slot, many conservators like using strips of pink insulation board. If you stack 4 strips, you reach about 2 inches of thickness or depth for your slot. 2 to 2 ½ inches is pretty standard for slot depths based on original base carvings. Stack them and wrap them with a good duct tape to hold them together. When it comes to making any slot mold, you should be at ¼ to ½ bigger all the way around, than the actual dimensional size of the tablet bottom. Make your slot molds accordingly. A cheap Crisco type of shortening can be used as “mold release” to separate the box mold from the concrete, as well as the foam slot mold from the concrete. This ensures easy removal of both after your concrete has set up for a day or 2. After working with the pink foam slot molds enough times, you will find they not only pop out easily, but you can reuse them several times. We will be putting together a video showing exactly what has just been described.
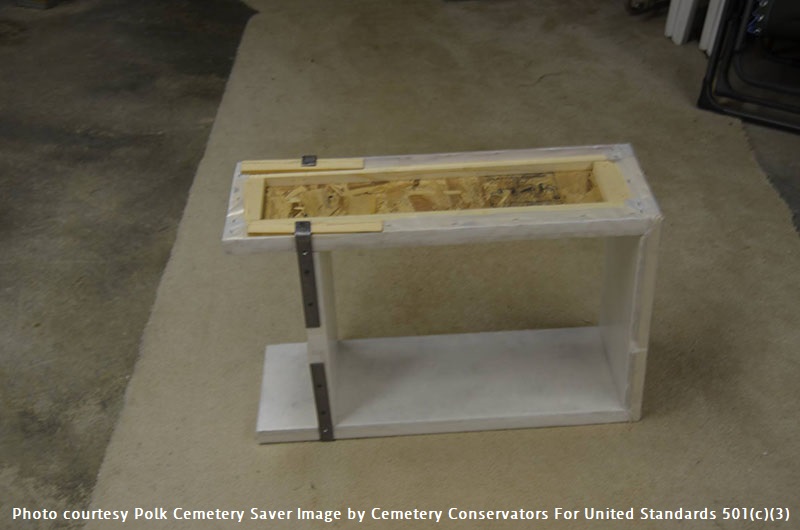
These are some molds simply made from treated 2 X 10’s and 2 X 12’s and the job they were used on. They are simply attached with 2 inch deck screws, making them easy to take apart and remove after the base is cured. These particular molds have no wooden bottoms and are just 4 sided frames more or less of a box. Not having a bottom will require a very nice level square hole to be dug out. This can become necessary when you start making 240 lb. bases that become hard to lift or maneuver. When possible…try to leave a few inches of the new base exposed above the ground. It is far better for a mower to damage a new base than the actual grave maker.
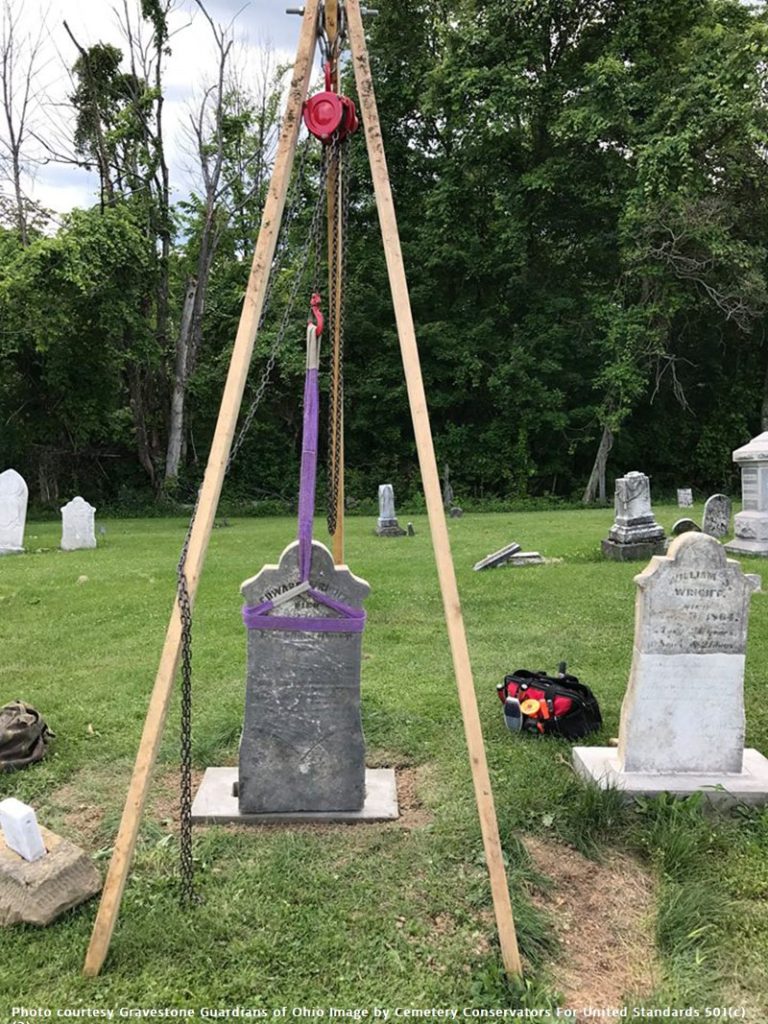
Above is an example of a 240 lb. plus base that was poured in the ground. Often the stones that go in these heavy bases, are heavy as well and require some assistance with a tripod to set them in place.
Above is an example of an adjustable box mold that allows you to lengthen the size of the finished base.
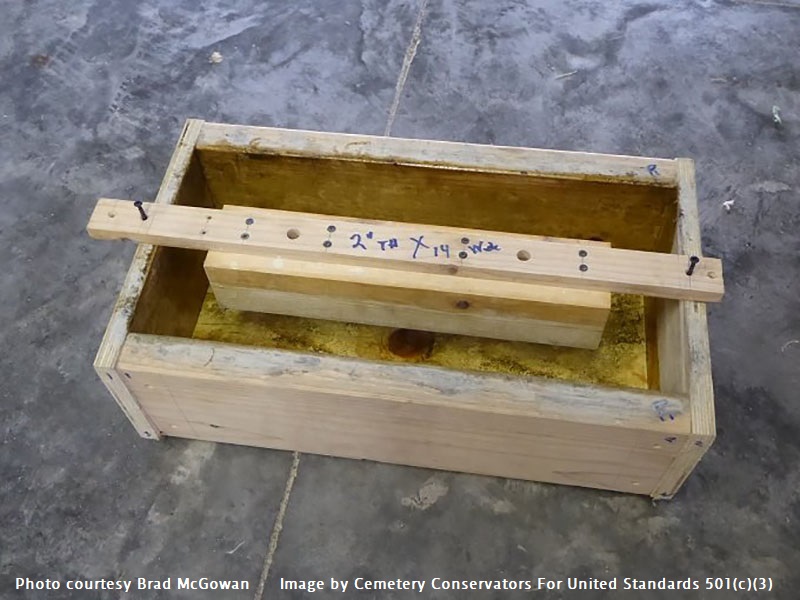
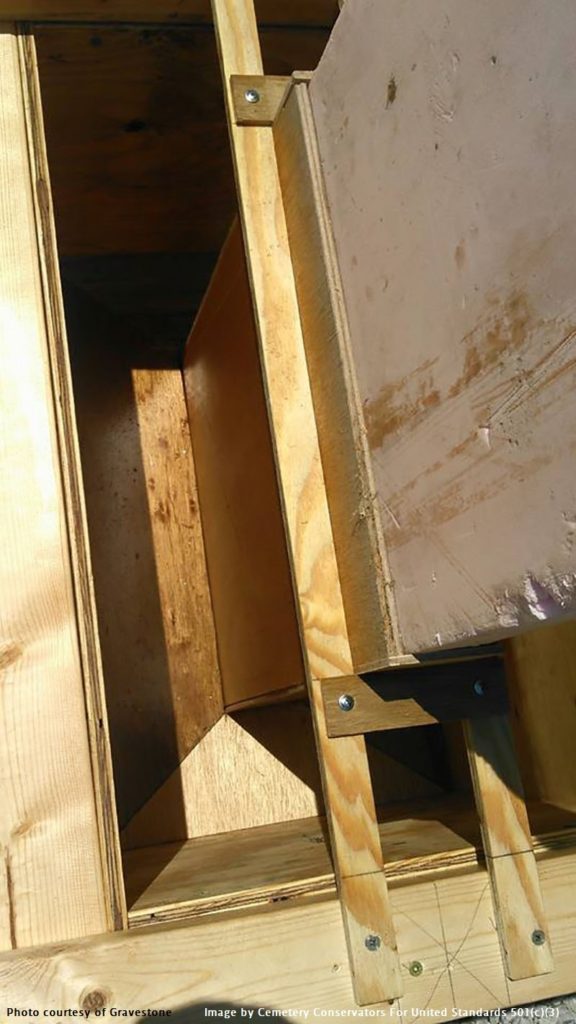
An example of a box mold with a bottom that makes it ideal for pre-casting bases off site at home. This mold has a wooden removable slot mold that anchors to the edge of the mold which allows it to stay level and in place.
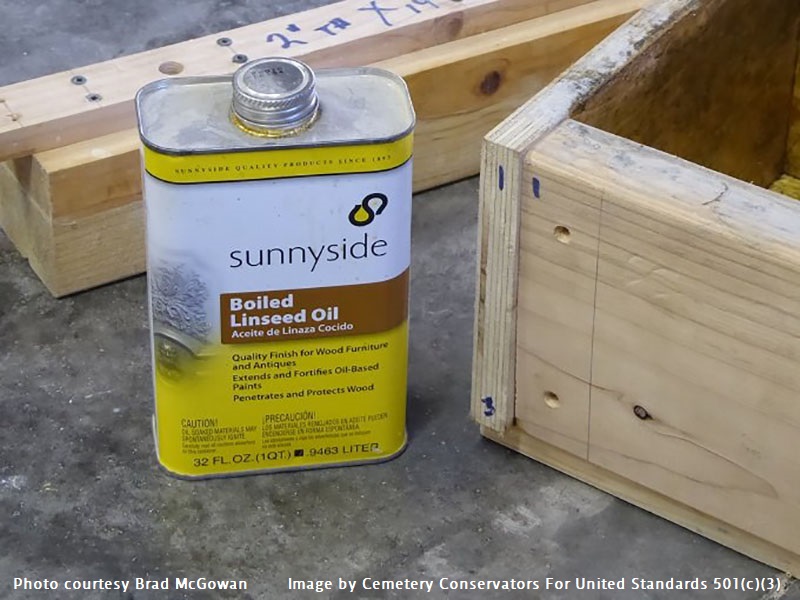
This conservator has chosen to use linseed oil as a mold release and has laid out all you need to manufacture this slotted base.
This rather more complex base mold is what many conservators are referring to as a “sleeve or collar” type base. It is ideal for resetting a tombstone that was originally a tablet set, but now due to a break or stone loss, cannot be tablet set again because the stone is too short to set by the rules of 3rd’s. “You can find out more about this rule of 3rd’s by visiting our section on tablet sets”. It also has a chamfered surface on 1 side for aesthetic effects. This is the bottom of the mold as you view it in the picture. When this base cures, you would simply flip the stone upside down making the chamfered side face up.
This is a hand carved replacement base made from limestone. Replacing a base this way is another option if you have stone carving skills or can find a carver. The chamfered design of this base was the inspiration for the base mold above
We will continue to add new molding methods as they are shared by our conservators and become available. With a little practice you will have no trouble choosing 1 of these methods and turning out solid well-made and good looking replacement base. Take your time and follow the procedures as laid out.
Below are some calculations from cemetery conservator Brad McGowan explaining his method for constructing base size in accordance with tablet size.
Slotted base form construction, the way I make mine, Readers Digest version. The form should be 7″ wider left to right and 7″ deeper front to back than the stone you are setting in it and a minimum of 6″ thick. So if your stone is 2″ thick the form should be 9″ wide front to back if your stone is 16″ wide then your form would measure 23″. The 6″ thickness is for a stone up to 42″ tall for every 6″: over that add 1/2″ depth to the thickness. The slot should be 1″ wider than your stone and 1″ thicker, per our example slot would be 3″ X 17″ X 3″deep. For every 8-12″ of measured height add 1/2″ to depth of slot. The form needs to have a release agent applied in this case boiled Linseed Oil brushed on the interior of the form, this keeps the concrete from sticking to the form and to the slot form. The two ½ bolts are to aid me in removing the slot form, as the concrete sets I gently rock the bolts creating a gap between the form and the concrete, do not get in a hurry to rock the bolts. I use Sacrete just follow the directions on the bag, I also use a mud box and a hoe to mix the concrete.
You can also find a detailed calculation for amounts or volume of concrete used for manufacturing bases according to mold size, under ARCHIVES…PDFs…INDEX…Base Manufacturing Calculations.
A short movie showing and explaining some of the methods used above will be coming soon and will be added to this website.
November 25, 2018 – CEMETERY CONSERVATORS FOR UNITED STANDARDS
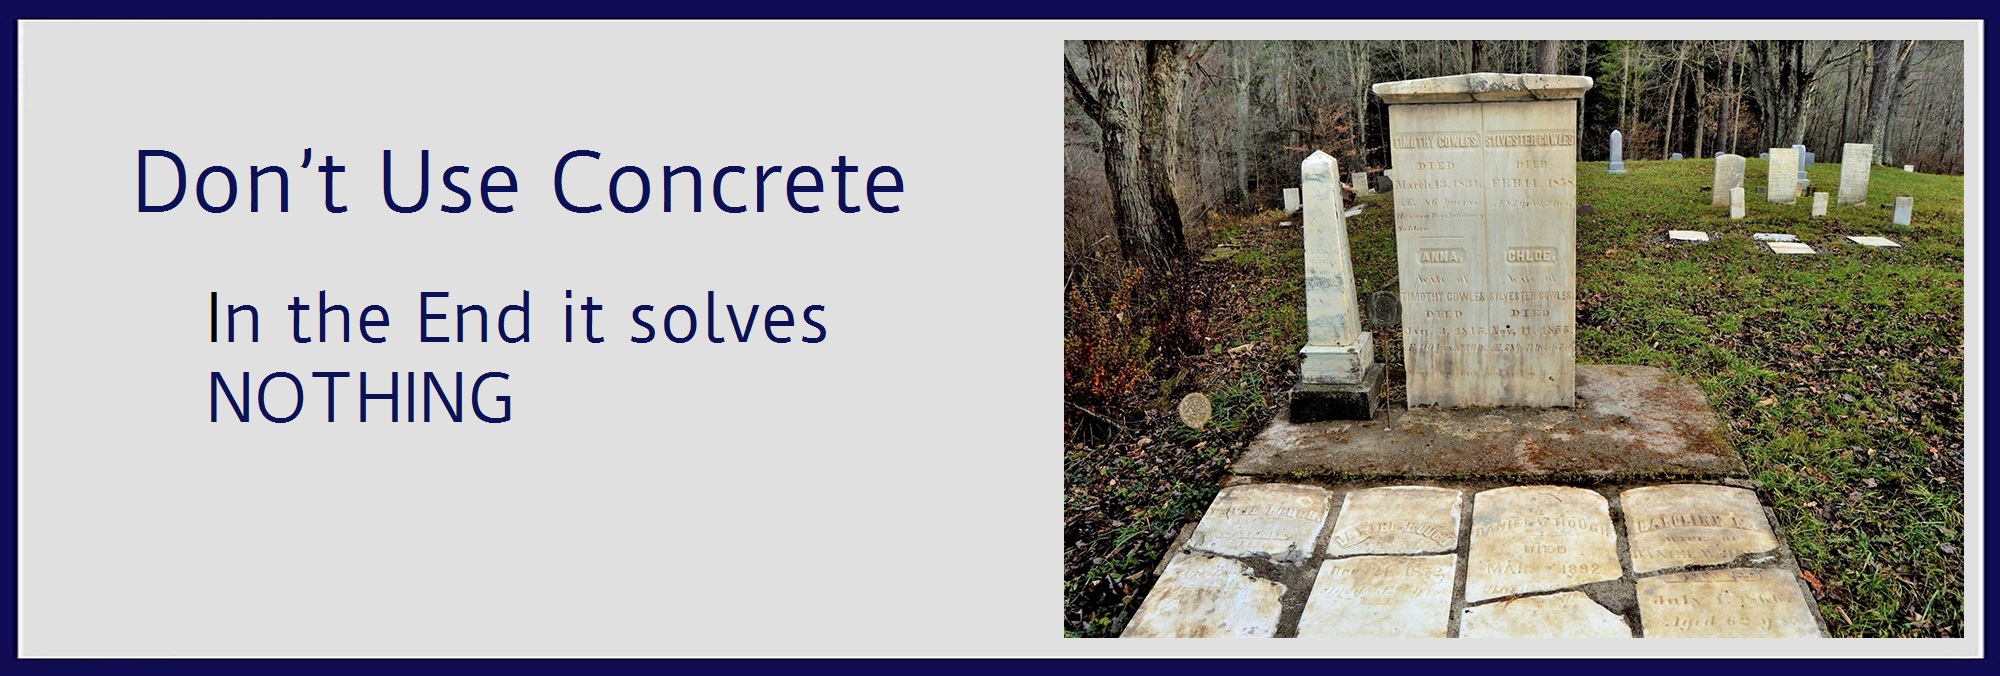
Don't Use Concrete
Now that we have walked you through the “do no harm” methods for mortaring tablets into slotted bases and manufacturing new slotted bases, we will explain the harmful methods some have used in their stead.
Don’t Use Concrete – why concrete is a bad thing. I’ve often said that concrete in a cemetery should only have two purposes. One…to form pads for grave markers and monuments that have some type of base. And two…for recasting new slotted bases to replace originals that can’t be repaired. I exclude grave markers originally made from concrete. They are another issue entirely. I stand by this firmly because I’ve seen the damage done by countless tons of concrete poured and unwittingly placed in almost every cemetery I’ve been in. Concrete as a fix SOLVES NOTHING. Quite simply…if the original marker did not require concrete to begin with, don’t make concrete part of its restoration. But sadly this is often the first item so many people reach for in the hopes of making something permanent or more long-lasting. The results are always the same. The softer grave marker is now permanently encased in a harder substance. It is generally face up to all the elements and wears much faster. Freeze and thaw cycles will crack and break the stone. And it is still going to sink into the ground. So really nothing has been solved with this method.
This destructive practice has been going on for the better part of the 20th century to the present. It seems to have been very prevalent in the 1950’s and 60’s as some sort of cemetery cleanup method. As a result many tombstones and monuments have paid the price. We can’t undo what has happened in the past before better preservation techniques came along. But we can learn from this and discontinue it today.
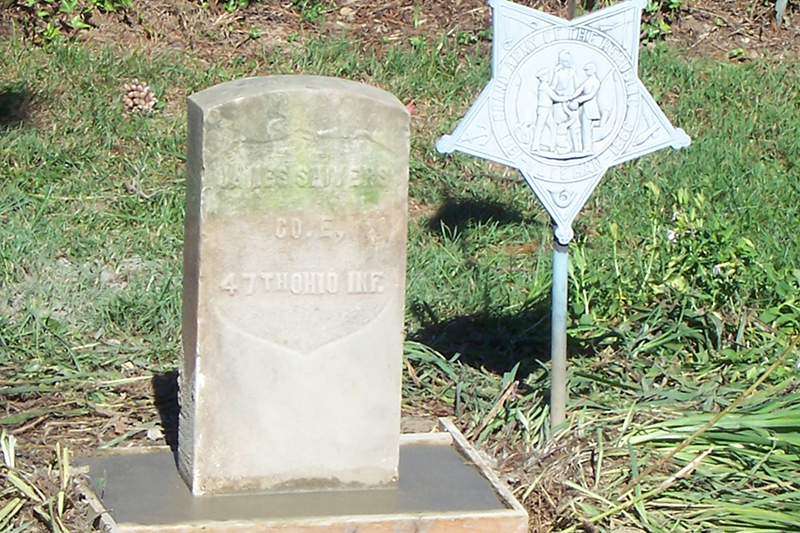
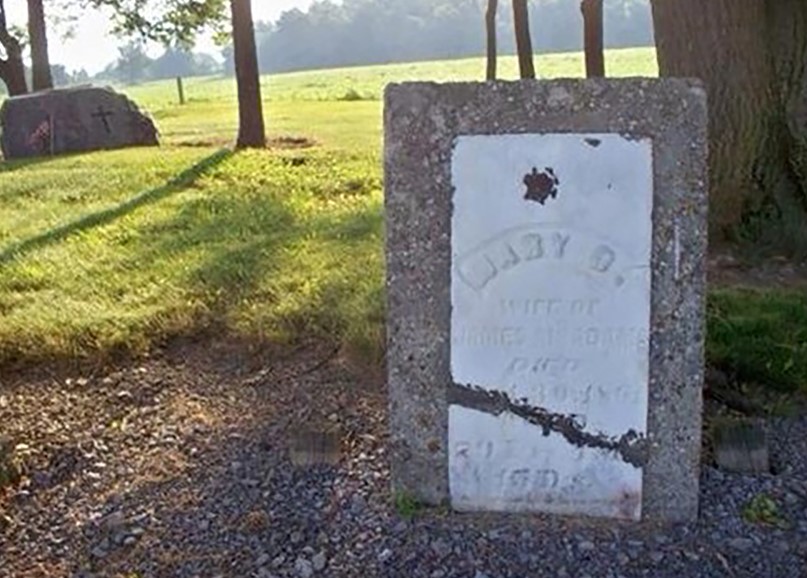
This white marble govt. issue military marker is a prime example for not using concrete. Judging from the greenish/brown line that runs through, “CO.E” on the stone. I would say it sank to within a few inches from its top. This happens quite often and is usually caused by the settling of the grave. Or it could be due to things specific to the typography of the cemetery grounds. The natural fact of things is, that the earth is ever changing and will always move and change the grounds surface. So placing this marker in concrete won’t change that at all. What it has served to do, is to put a soft marble stone in direct contact with a much harder material by placing it into wet concrete.
People seem to think this sort of concrete collar will steady the stone and prevent wobble and lean. Not so at all. It will now just act like a fence post with a weight around its neck.
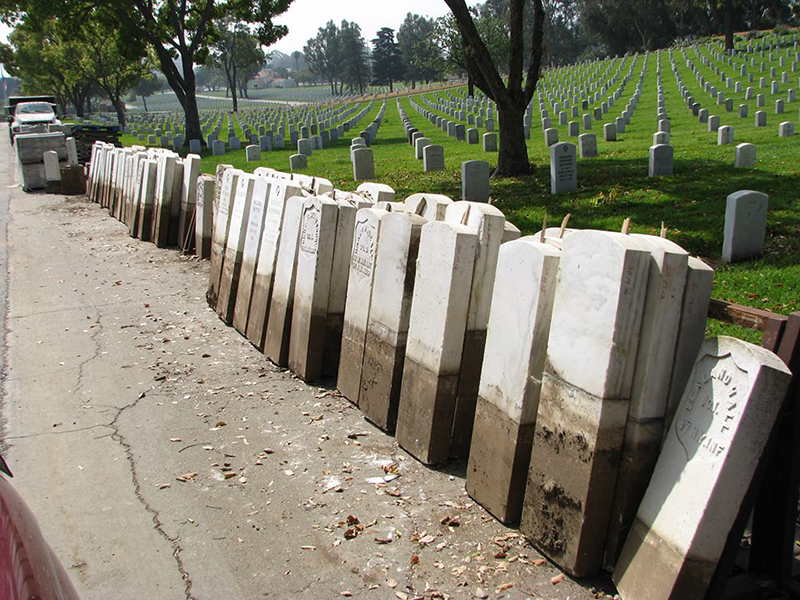
These are govt. issue military markers at a national military cemetery. Some are being reset and others are being replaced. Notice all the different sizes in width and height? They range from just over 3 ft. to over 4 ft. in height. These are also known as a, “tablet set” type of marker or tombstone. They are set directly into the ground like a fence post. You can see a great video on this under BASIC STANDARDS…Tablet Set. I can assure you, they are not using any concrete here.
Here is another bad use of concrete. The long sidewalk pad approach. This is generally done through the quick easy clean up to mow faster method. When this occurs, most likely no real effort was made to probe for, locate, repair, or reconstruct the cemetery. This is always a sad fate for these artifacts and their now lost priceless information.
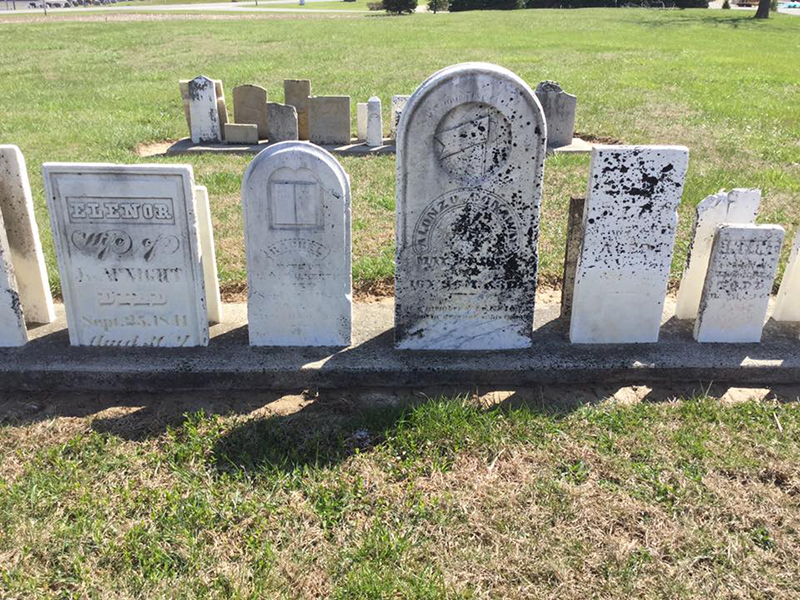
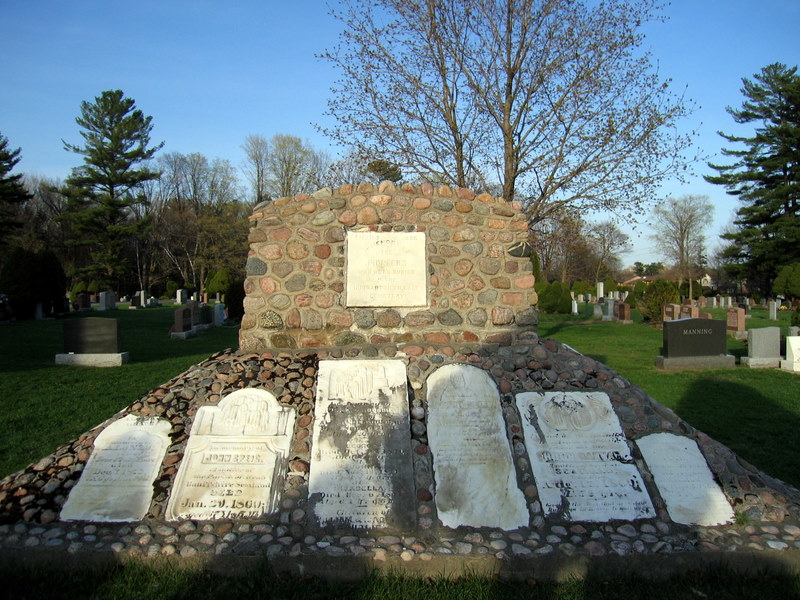
This is another sad concrete display. Although the stones are on an angle and not totally flat, they will still weather badly. Sadder still is that 5 of the 6 stones look to be intact with legible writing. Wouldn’t it have been a lot easier and less costly to have simply reset them? One can only imagine the time, effort, and money it took to build such a megalithic sort of monument like this. And it’s all damaging to the thing it was intended for.
Concrete encasement seems to be another popular method to fix simple breaks. This is using an elephant gun to shoot a mouse. And sadly both tombstones appear to be simple single tablet breaks. The stone on the right even has its bottom piece intact and still protruding out of the ground. Now it can’t be mated to that piece, making that part no longer relevant to this situation. And judging from the rather short length of the rectangular encasement, I doubt it is tall enough to set properly. So on this one, your guess is as good as mine as to the final disposition of this repair.
When I inquired of these two gentlemen the reason for this wet molded concrete block addition. They said it was added because the stone wasn’t level. I told them that I understand this and deal with this sort of thing all the time. I then explained this is simply a matter of raising and leveling the stone. And added because of the carved design clearly visible on the sides, this base block was meant to be seen and not buried. They quickly barked back exclaiming, “we just don’t have the time to do it right.” No time to do it right? I wonder how much time, money, and effort was put into hauling concrete and water to this remote site and then mixing and forming this unneeded piece of damage?
Here is an example of why tombstones, and in this case, their pieces should not be permanently fixed. CCUS member Scott Andersen has been restoring a cemetery in his hometown for the last 3 years. He and his dedicated group have worked with many jigsaw puzzles and tombstone pieces so far. But sadly some years back, before they started their work. A stone wall was created and many of the tombstone pieces were forever locked into this wall. In the picture you can see they found the mate to one of the pieces in the wall. Again, this happened some years back and the damage is done. The point here is to not repeat these same damaging mistakes.
There are no easy button solutions to cemetery preservation through the means of concrete.
We would also like to add to this by saying, all hope is not lost. The situation just becomes much more precarious and involved, and will require the intervention of a more skilled professional. It literally takes hours to remove the concrete encasement. Often requiring a diamond blade to remove the concrete to within a ¼ inch of the tablet. Chisels & special dremel tools are also employed. And it still takes hours of painstaking careful work. Time must be taken so as not to not damage the edges of the tablet. And with some luck, maybe those who used the concrete mixed it poorly and applied it to a dirty surface, in turn making for a poor bond. This sort of restoration should always be handled by a professional or an individual who has first take a class in the basics and moved on to more advanced training.
For further information please read our document in ARCHIVES…CONCRETE – A Bad Solution. And watch the video below on this subject. This video completely explains this subject.
Other areas of interest that pertain to slotted bases
For more discussions that may have a bearing on slotted base methods, mouse over PRO VS CON and choose The Field In General and Method Issues. You may also find the other categories under PRO VS CON helpful as well.
This section is here to weigh out the many “Pros VS Cons” that seem to exist in this relatively young field known as the cemetery preservation and restoration. A young field born out of the need and want to maintain the memorials left us in cemeteries. Maintaining things from the past has been around almost as long as the past itself. Art, documents, books, buildings, and now cemeteries. After the desire to save these things is met, then begins the how to save them, through what means and with which forms of maintenance. This quickly becomes a much clouded issue for many. We hope to lift this fog with some simple fact based thoughts and principals. Our cornerstone or main pillar for doing this will be a thing called, “Do No Harm”.
This section has two main goals. One is to lay out and examine the field itself and all of its controversial issues, problems, and divisions. The second main goal of this section is to lay out the said issues involving methods, techniques, and products, and run them through the list of 6 or more questions below. This is where you find the meat of the discussion before it is weighed out with these questions.
We are addressing as many of these issues as we can at this time with the following subcategories in this section. “The Field In General” subcategory addresses the overall methodology of the field itself. Other subcategories such as Cleaning and Bonding Agents, and others to be added, will address more specific methods and products.
These are the 6 standard questions we will ask of all methods, techniques, and products suggested or discussed on The Cemetery Conservators For United Standards website. Additional questions may be asked pertaining to a given subject depending on the need to ask them based on the subject. You will find the completed version per product and/or method under SOURCES…Pro VS Con Results.
1…MSDS… based on the MSDS recommendations. (Scale of 1 to 10) 1 being the most invasive or highest risk to a person’s health & safety. And 10 being the least invasive or lowest risk to a person’s health & safety.
2…Testing…has it been tested? (Scale of 1 to 10) 1 being the lowest # of testing done. And 10 being highest # of testing performed.
3…Longevity & Performance… based on reliable reports concerning how long & well the product holds up. (Scale of 1 to 10) 1 being the shortest longevity & lowest performance. And 10 being the most longevity & best performance.
4…Track Record & Wide Spread Use…How well has this substance or product in this technique held up over the years & how many places has it been used? (Scale of 1 to 10) 1 being the worst track record, least widely used, & least places used. And 10 being best track record, most wide spread use, & most places used.
5…Permanence…is the substance or product in this technique, reversible or nonreversible? (Scale of 1 to 10) 1 being the lowest possibility of reversal. And10 being the highest possibility of reversal.
6…Cost & Training…how expensive is the product & is there specified training required & what is its cost? (Scale of 1 to 10) 1 being highest cost & most training. And 10 being lowest cost & least training.
TOOLS & SUPPLIES…things we suggest to better aid in your cemetery preservation work can be found here.
TECHNICAL…is the place where we house all information for products used and has Product Explanations, Product Information Sheets, and MSDS
SAFETY…is always an important place you should visit at every step along the way
SAFETY – a place for all safety related issues found in cemeteries and in the preservation of cemeteries. Every year people are killed due to unstable stonework in our cemeteries. Over time many of these monuments begin to lean and teeter. And unsuspecting visitors are crushed because they disturbed one of these loose monuments. We wish to remind people of this situation and caution them from such tragedies. Safety is also equally important for those who choose to do some sort of restoration work. The hazards can range from a pinched finger to being killed by a large stone. I can say all of our members take safety very seriously and make it our constant number one priority in everything we do. We please ask that you do the same. This section will try to address this issue as much as possible. Let’s all be safe out there in all that we do.
This is where you will find the latest video links to cemetery preservation and restoration. There are many great videos from both professional organization and CCUS members. We will constantly add new media as it becomes available. Mouse over VIDEO and choose an area of interest. You will find one of the six areas below to view.
Cleaning – the best ways to clean with no harm.
Hoist Work – lifting stones with a hoist type system.
Repair Work – putting the broken pieces back together again.
Good Preservation – what good preservation looks like.
Bad Preservation – what bad preservation looks like.
ARCHIVES…is where we house downloadable pdf’s and FREE cemetery preservation related images for you to use. We have jam packed this ever expanding library with pdf’s on important cemetery related issues. We wanted you to have a place where you could easily view, print, or download important information. We encourage you to share it with other individuals or groups you may know that are interested. There is no such thing as too much cemetery awareness.