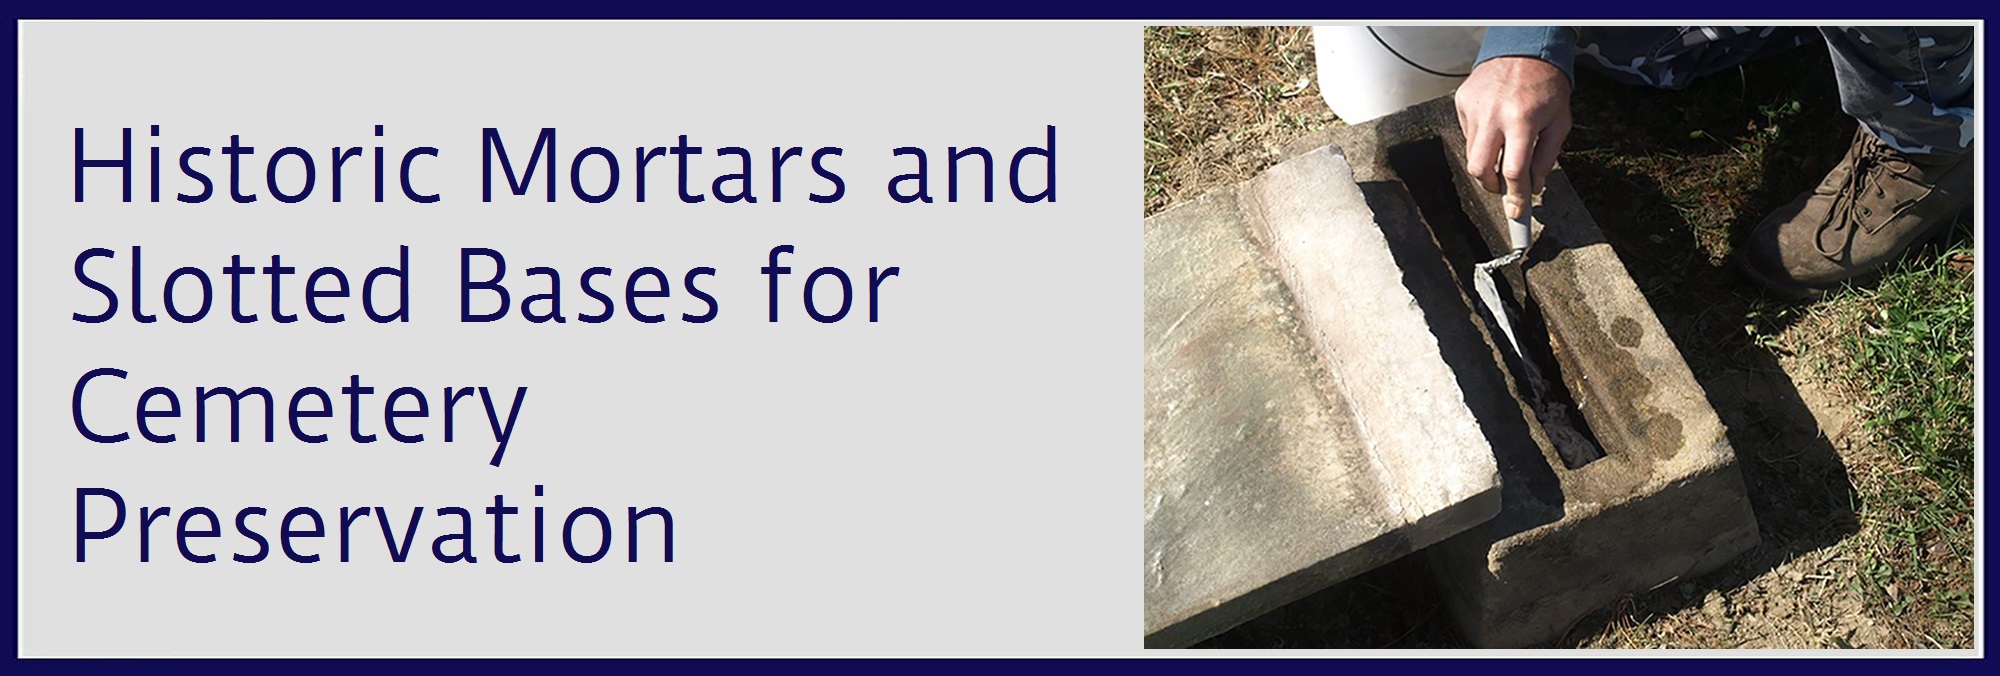
Tablet type stones in slotted bases are one of the most common types of monument you will encounter. These bases were made from a variety of quarried stone types, often central to the area of the cemetery. Bases are generally rectangular rough cut blocks with hand chiseled slots to accommodate a tablet style stone. The inscribed grave marker was then mortared into this slot. When this mortar wears away and the stone becomes loose, it then becomes necessary to re-mortar it back into place. At this juncture it is now important to understand historic lime mortars. Why lime mortar and not a modern concrete mortar? Lime mortars are durable, yet much softer than modern mortars found at local building supply stores. It is very important to use a lime mortar for this reason. Modern mortars are too hard for older softer grave markers made of marble, sandstone and the like. These harder mortars and concretes will do much more harm than good. The softer lime mortar acts as an adhesive and a buffer between the tombstone and base. This section below will walk you through the basics of how to accomplish this. You can also find a list of materials required under PRODUCTS USED…Mortars. And further information under TECHNICAL concerning MSDS.
The following is a great tutorial on mortaring tablets into slotted bases with a focus on the approved standard methods used in Oregon. We feel this is a great place to start when it comes to re-mortaring tablets into slotted bases. More on this procedure and mortar products that are widely accepted across the rest of the country, will be addressed below this article.
RESETTING HEADSTONES IN SLOTTED BASES
By CCUS member Lloyd Collins of Polk Cemetery Savers
Headstones in most of the cemeteries across the country have either been set in the ground, in slotted bases, and some rare cases in concrete. Over time, the ground has shifted, rodents have burrowed under the bases, or animals, using them as scratch poles, have pushed the headstones off of vertical. Vandals have also caused damage by pushing the headstones over or breaking them in pieces. Whatever the reason, some of the headstones are no longer standing vertical. It is to the benefit of these headstones to be cleaned and reset so they stand vertical. The headstone can then shed water and breathe properly.
Slotted bases in cemeteries have been set above ground, half buried, or totally buried. The base may have been placed on an earth, gravel, or crushed rock bed. Inspection of the base should give you a good indication of how deep it should be buried. Depending of the severity of the climate, the base should be placed on a proper bed so the freezing weather will not push it out of the ground. The depth of the base should match the majority of the bases in the cemetery.
Over the years, headstones in slotted bases have been set with many types of material. A few include; dirt, clay, wood wedges, lead wedges, molten lead, mortar, lime, and some other materials harder to define. Some have been set with a very hard black material that chips off like Obsidian. See the section on materials to see CCUS preferred material to be used when resetting headstones.
PRECAUTIONS
Resetting headstones is a two person task at minimum. Always work with a partner.
As with any work done on headstones, the stone must be carefully inspected before any work is started. Headstones, even though they are made of stone, are very fragile. Over the years they may have developed damage from the environment. This damage could include delamination, stress cracks, and areas where water has infiltrated the stone and frozen causing larger cracks or broken areas.
Before moving a headstone, ensure it is structurally supported to prevent any new damage. A supporting structure could be as simple as two pieces of wood strapped to the headstone. I have made a wooden platform that allows the headstone to lie on a carpet pad. The stone is loosely strapped to the platform and two people can lift and move the headstone without damage.

If the stone is broken, it should be cleaned and repaired before resetting it in the slotted base.
When moving a stone that has been lying on the ground ensure it is supported along its’ entire length as you lift it onto a flat surface for cleaning. Clean the headstone using the procedures and materials in CCUS Bulletin # (TBD). After cleaning one side, inspect for stress cracks and proceed carefully, turning the stone over, to clean the other side. After cleaning, if the stone is structurally sound, it can be reset into a slotted base.
If there is a slotted base for the stone, inspect it for damage. Most original slotted bases are made from Sandstone or Limestone. You may find some made from Granite, and rarely, concrete. If the base is damaged, repair or replace it as necessary. See CCUS Bulletin # (TBD) for making slotted bases.
LEVELING THE BASE
Excavate all four sides of the base. Save the grass on a separate tarp so it can be replaced after the work is done. Place the dirt on a tarp or other material. Determine what type of bed is under the base. If necessary, remove the base from the hole. Level the base by rearranging, removing, or adding material in the hole or under the base until the proper depth is reached. Compact the material under the base and ensure the base is level and aligned with the other markers. In some cases you may have to move the base a few inches to align it to a row. Some rows are not aligned. If this is the case, just square up the base to the grave site and/or leave it in its’ original location. Fill in the dirt around all sides, compacting it as you add dirt, until all dirt has been used. You may need extra dirt. Replace the grass and tamp it down to ensure a professionally left area around the base.
CLEANING THE SLOT
The slot may be filled with dirt, material from a previous setting, and broken parts of the headstone. If there are broken parts and they can be removed without further damage, they can be epoxied to the bottom of the headstone before resetting. If the setting material is hard you may have to use a hammer and chisel to carefully remove it from the slot. The setting material should be softer than the stone. Take your time and chip little pieces at a time. The edges of the base slot are also fragile. In some rare cases you may need to use a diamond saw to cut the edges of the material so it can be chiseled out. Be careful not to cut the base.
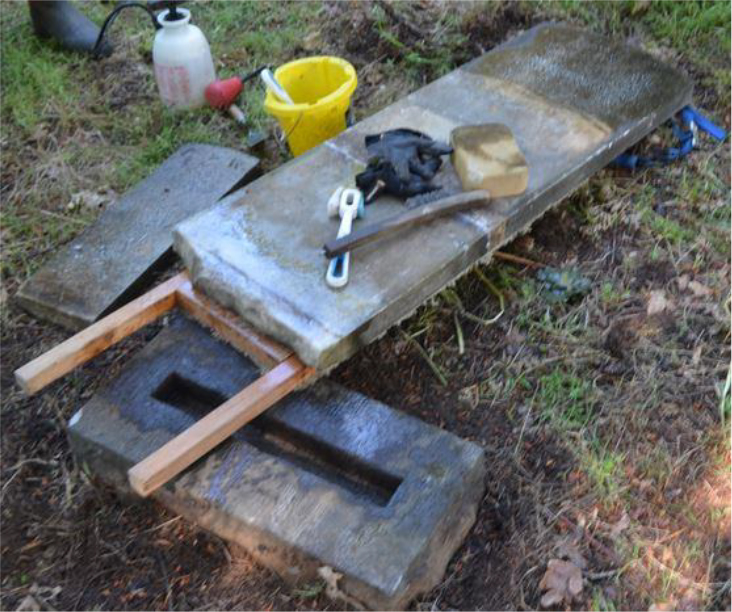
When the slot is cleaned, you can do a test fit of the headstone to ensure it has a solid fit. Carefully carry the headstone to the base. Ensure the bottom of the headstone is fairly square and fits into the slot without any gaps showing above the slot. If it wobbles you will need to remove pieces of the bottom or place pieces of lead or other material under the bottom of the stone until it is plumbed. I have found the use of lead fishing weights work well. They can be flattened as necessary to plumb the headstone.
RESETTING THE HEADSTONE
Now that all of the inspections and preparations are finished, you are ready to reset the headstone into its’ slotted base.
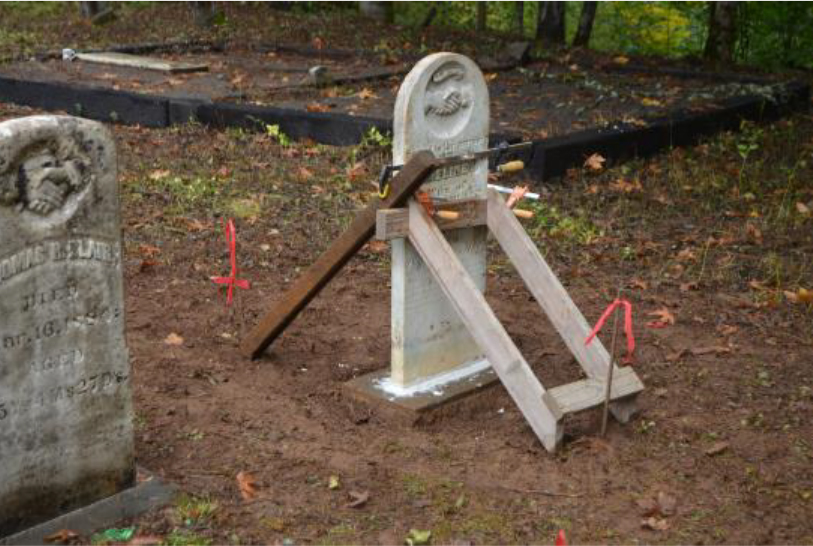
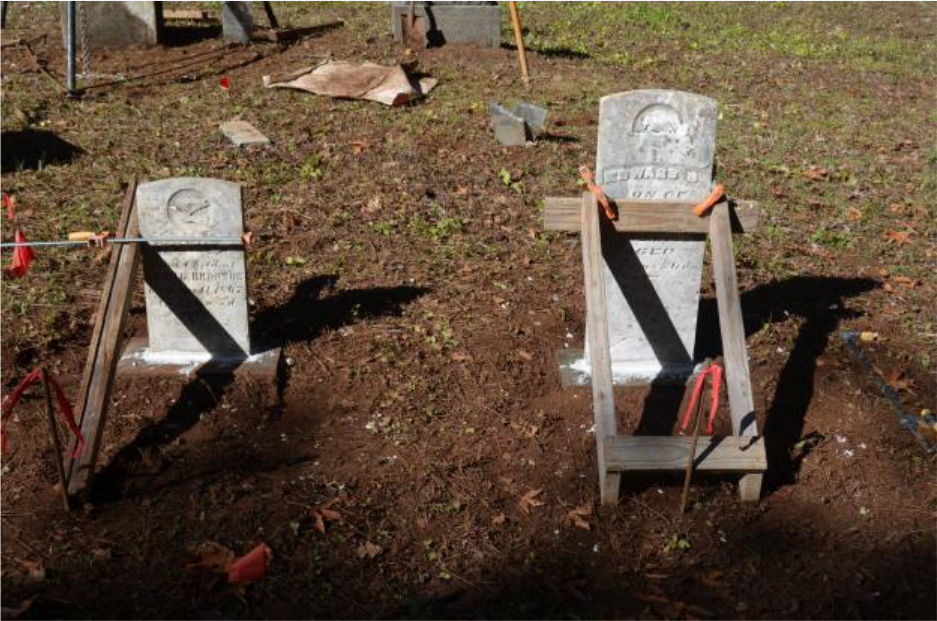
Carry the headstone to the base. Carefully place it into the slotted base and hold it upright in place while your partner attaches the wooden braces and clamps to the headstone. After the clamps are in place, ensure the headstone is plumb. Lift the headstone out of the slot and place it on the edge of the base or on pieces of wood. Keep the bottom of the headstone clean. Mix up the setting mortar. Ensure the leveling spacers have not moved from their location in the slot. Trowel in the setting mortar being careful to not move the leveling spacers. Ensure there are no holes in the mortar placed in the slot. Place enough mortar in the slot to ensure some is squeezed out around the bottom of the headstone when the headstone is placed into the slot.
Place the headstone into the slot. Press down on the headstone until it bottoms out in the slot. Adjust the wooden braces and clamps if necessary to plumb the headstone. Tighten all clamps and drive steel stakes at the end of the braces to keep them from moving. Check again to ensure the headstone is plumb. Remove excess mortar and use the putty knife to smooth the mortar and the pointing tool to make the final grooved finish in the mortar. Do not leave any areas that can fill with water. The finished joint should allow water to run off onto the base. Allow the mortar to set for at least two days. Check the mortar to ensure it has hardened sufficiently to allow the removal of the braces and clamps. If not, allow it to set another two days. After the mortar has set, carefully clean the excess off of the headstone and base. Do not damage the pointed joint.
RECOMMENDED TOOLS AND MATERIAL
Below is a list of possible tools you may need when resetting headstones:
steel toe boots…leather gloves…tarp…shovel
tamper…lever…work table…grass knife
torpedo level…compressed air…pointing tool…gravel
crushed rock…lifting straps…chain hoist…tripod
chisels…wooden mallet…hammer…steel stakes
plastic bucket…water…nylon brushes…sponge
orvus soap…sprayer w/water…wooden braces…clamps w/plastic pads
plastic scrapers…putty knife…trowel…mixing pan
WARNING! Most of the following lime products have a very high PH. (11 to 13) It is imperative you read the MSDS for the items on this material list and take adequate personal precautions when using them. Some cause skin damage, and breathing dust will cause lung irritation. These two are among other warnings listed on the MSDS.
The materials listed below are recommended by CCUS:
Follow the mixing instructions.
Natural Hydraulic Lime, 3.5 or 5, manufactured by Saint Astier®
Lime Mortar, 1 part lime to 3 parts washed, well graded, sharp sand
However, recommended material used to reset headstones varies by State and National Organizations. Check your State and/or local requirements for their list of setting materials.
For instance, the material shown below is specified for use in Oregon.
White Portland Cement with extra lime mix to soften cement can be used to set stone in recessed base.
1 part White Portland Cement (recommended: ASTM C-150. Type 1)
4 parts Hydrated Lime (recommended ASTM C-207, Type S)
8 parts clean sand
There is a commercial product available special ordered from Home Depot, that with added lime, closely matches Oregon’s’ recommendation. We have received permission to use this.
Quikrete White Glass Block Mortar Mix with 5 parts added hydrated lime. This type “S” mortar mixture consists of 2 parts White Portland Cement, 1 part lime and 9 parts sand. (12 parts) By adding the extra lime, the mixture is sufficiently weakened.
Mix ratio… add slightly less than1 cup of hydrated lime to two cups of the Quikrete mortar mix.
CLEANUP
After the mortar has cured, clean any excess left on the base and the headstone. Tidy up the area. Leave it as if no one had disturbed the ground around the headstone.
December 12, 2016 – CEMETERY CONSERVATORS FOR UNITED STANDARDS
As you can see there are several lime mortar based mortar mixes and recipes that can be used for slotted bases. Unless your state or area has some specific stipulation concerning a certain type of lime mortar that must be used, here is perhaps the easiest and most accessible lime mortar for this procedure. We recommend an NHL 3.5 for mortaring tablets into slotted bases, as mentioned above. We draw your attention to this again because we feel it the simplest way to go about using lime mortar.
When bought in pure lime bag form, you need only add a fine sharp grade sand to mix your mortar. For best results, we recommend the mix ratio be 1 part natural hydraulic lime to 2 parts sand. For example…1 cup natural hydraulic lime to 2 cups sand.
There are also readymade non-pigment lime mortars that already has fine sand mixed in.
You will find NHL 3.5 under PRODUCTS USED…Noncommercial Mortars, because it is a lime mortar product that requires the addition of sand to make ready to use as a mortar. You will find Ecological Mortar (F) under PRODUCTS USED…Commercial Mortars, because it is a readymade mortar with sand included.
Manufacturing A Slotted Base
Quite often when we wish to mortar in a tablet stone to its original base, we find the original base is beyond repair. Most original bases were quarried hand carved stone from around the local area near to the cemetery. Pioneers and early settlers utilized the stone that was native to their area for all new construction. Many times using the same size and type of stone blocks that were cut for building foundations, bridges, or retaining walls. Sometimes the blocks were left rough and merely slotted to accommodate the tablet stone. And other times the blocks were dressed with finished sides and top. There are many varieties of shapes and sizes to these slotted bases. And likewise, there are many varieties of stone used such as sandstone or limestone, depending on what stone type was prevalent to the area. And sometimes, what is known as “carver’s mistakes” left over from a building project were also slotted and used. As you will see in an example below. When it comes to examining these original bases, there is quite often no real rhyme or reason that dictates their size and shape. Some are massively big in comparison to the tablet they were carved to hold. And others seem insufficient in size and shape to hold a tablet in place and level for any period of time.

The following is a tutorial that presents several options concerning the manufacturing of slotted bases.
By CCUS members Mark Morton, Brad McGowan, Lloyd Collins, and Reggie Ross
Here are some examples of original bases showing several different sizes and styles.
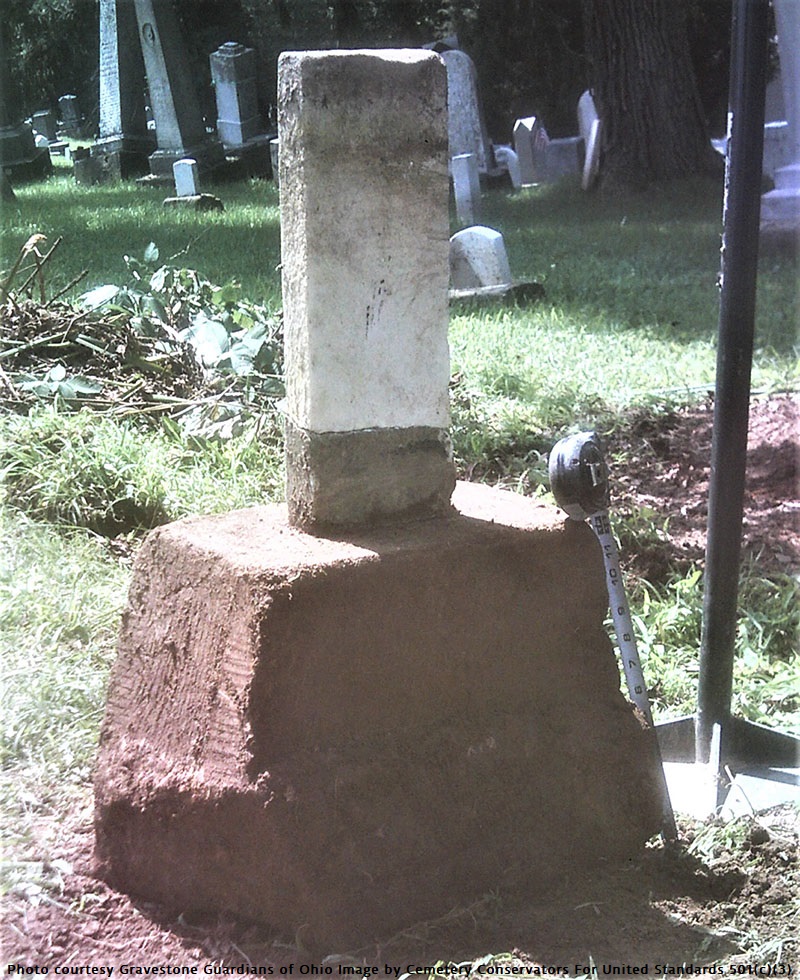
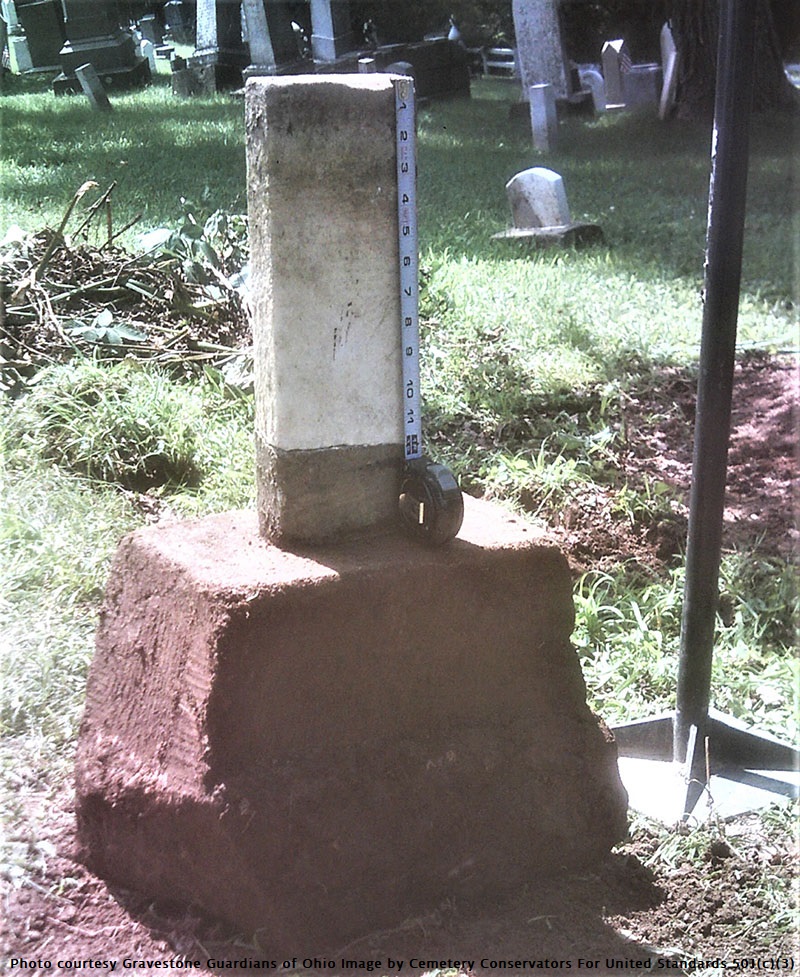
This base for a footstone is from Southeastern Ohio and is made of sandstone. It is a great example of a tapered block base which is quite prevalent to this part of Ohio from 1800 to the 1860’s. The base is massive for the small footstone it holds. The base measures at 1 ft. tall by roughly 17 inches long, and 11 inches across at the bottom, and weighs around 200 lbs. The footstone is 15 inches high and about 5 inches across and could easily be carried under 1 arm.
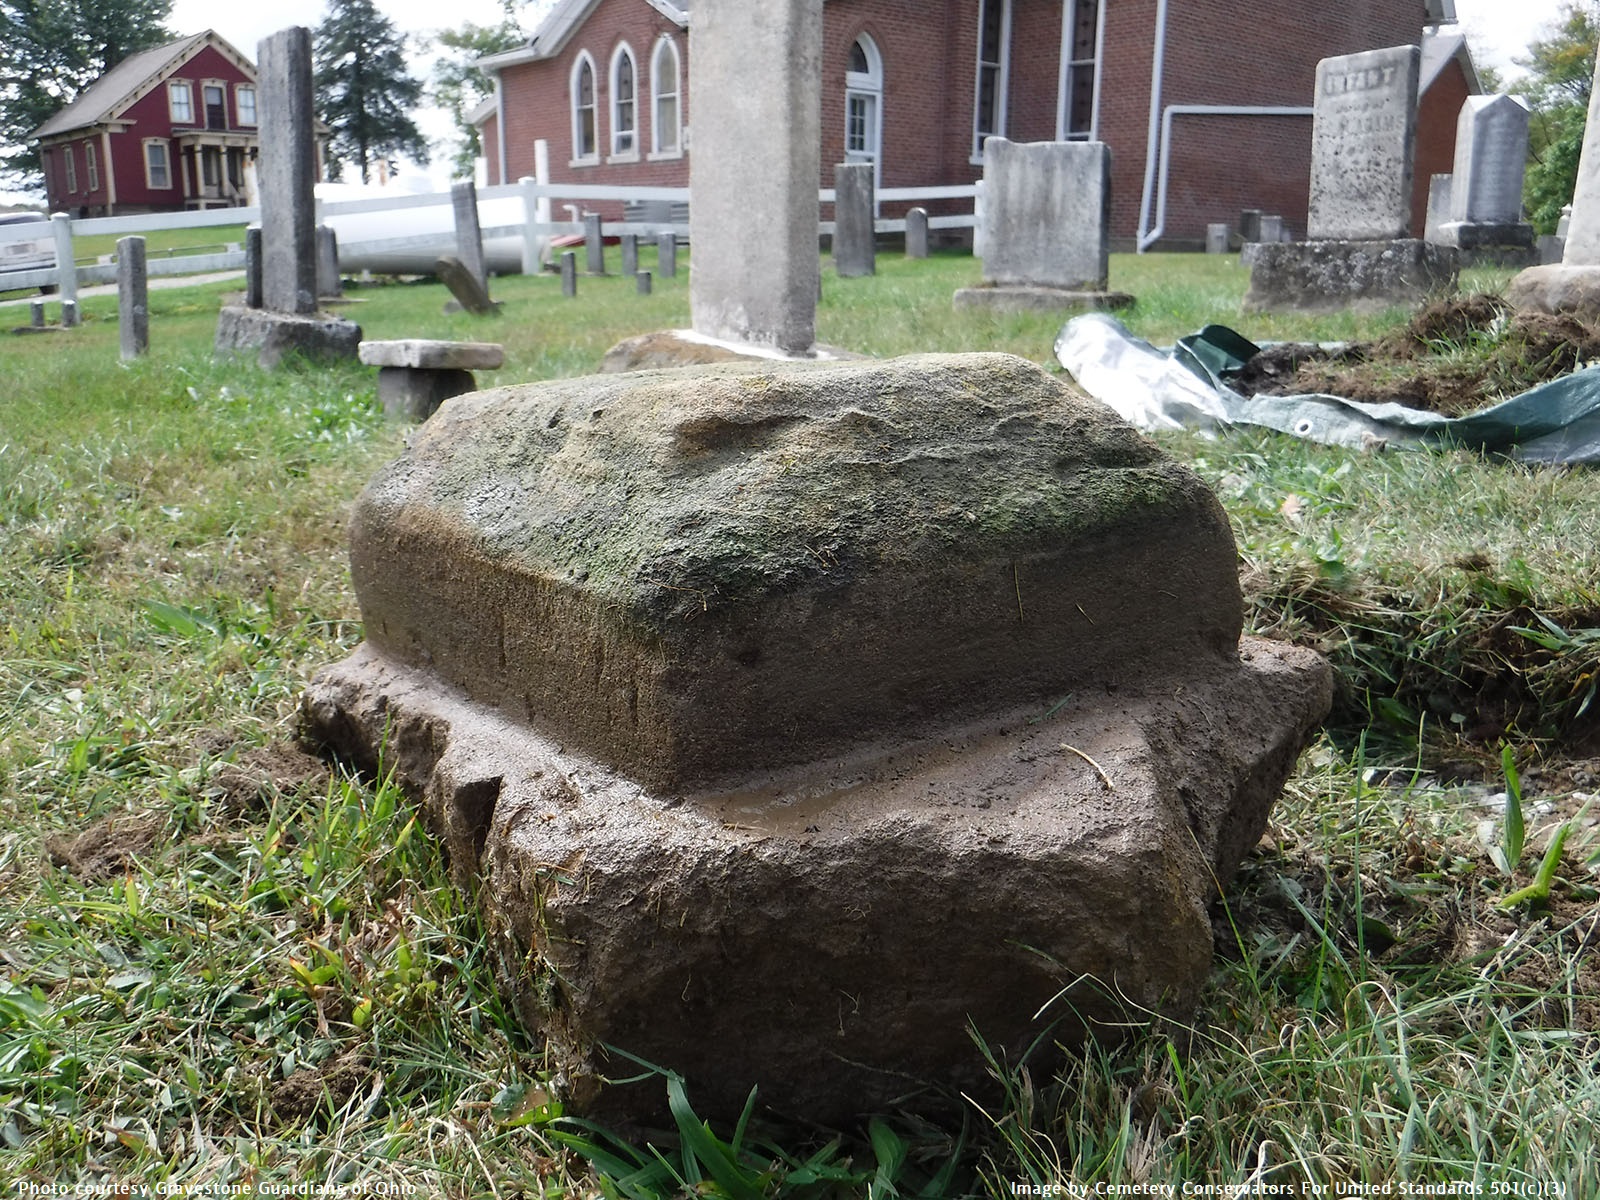
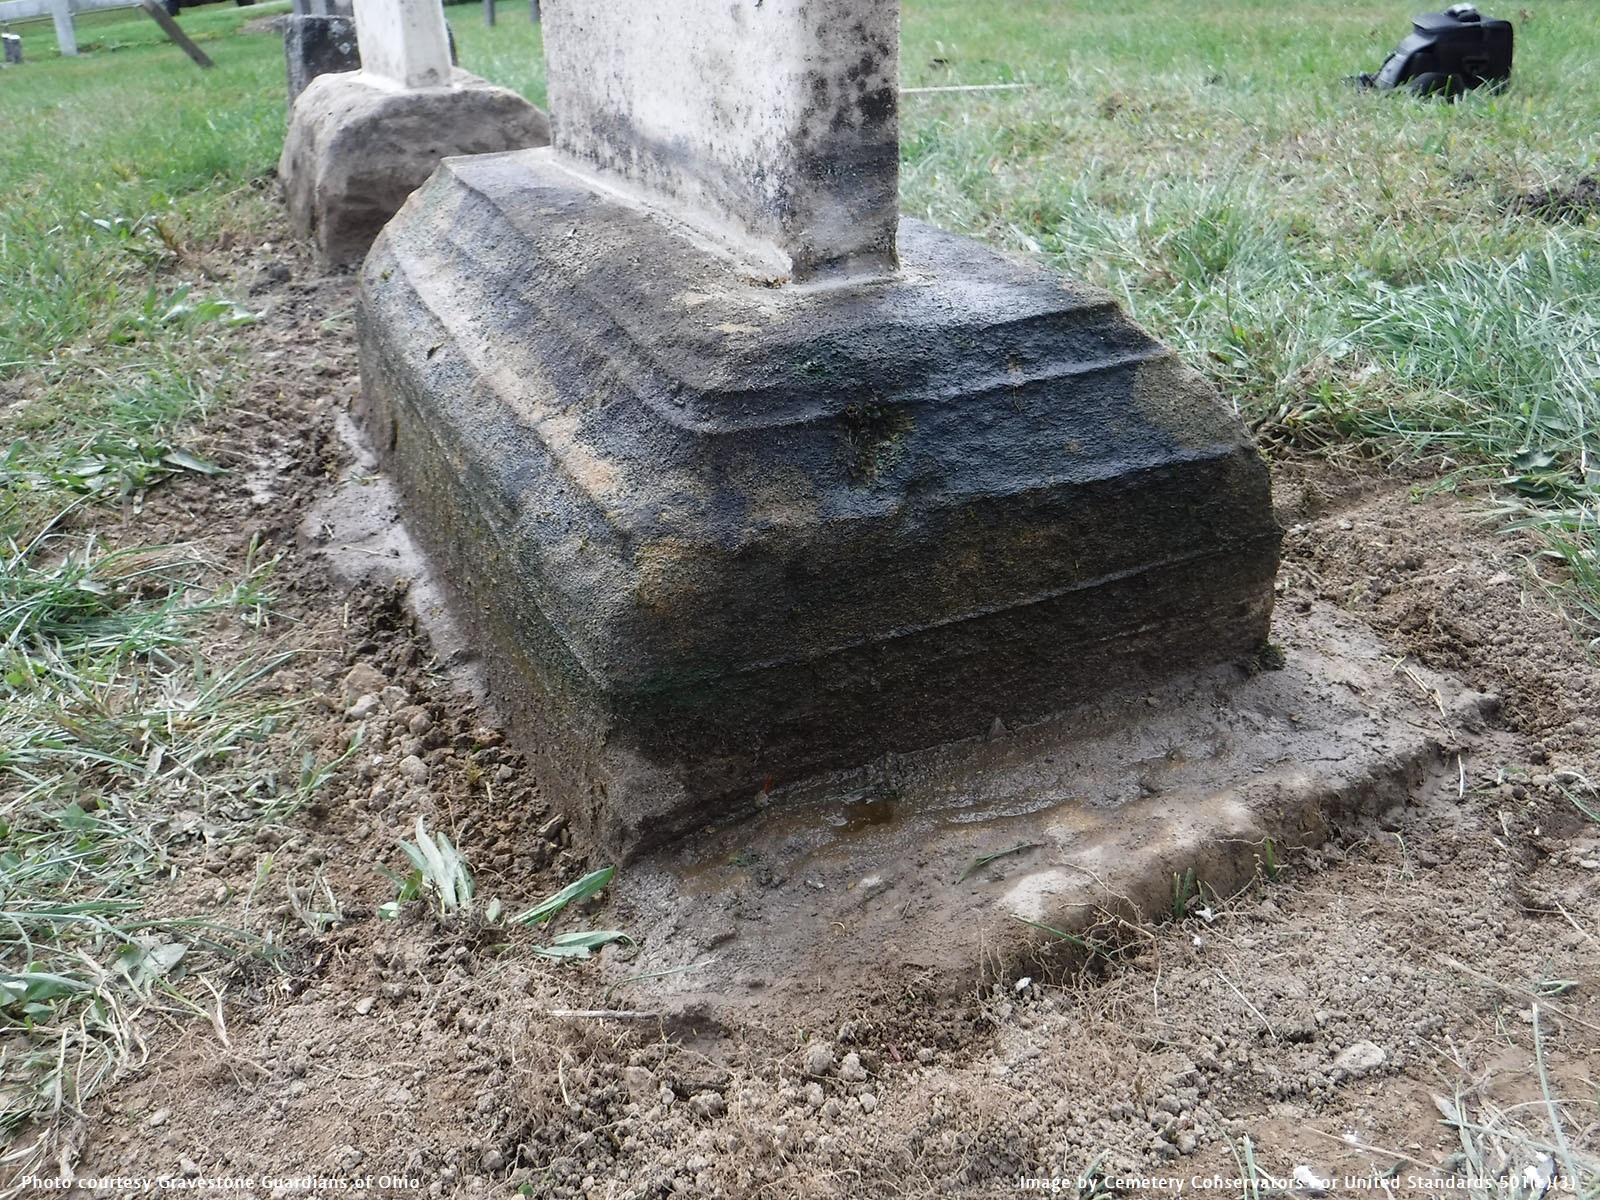
This is by far 1 of the most unusual base styles I have run across. It is from the same Southeastern Ohio cemetery as the footstone base pictured above. These are 2 different bases by the same carver. 1 is slightly more detailed than the other being the only difference. We seated all of these bases into the ground stopping at the point where the stone was dressed or finished. This is a good rule of thumb when setting any base that has this type of detail, if possible. The most important thing is that the base be seated deep enough so the stone does not topple. Some carvers got this balance point down very well, and others did not. Thus, sometimes you may have to set the base deeper than the cutoff point between finished and unfinished carving.
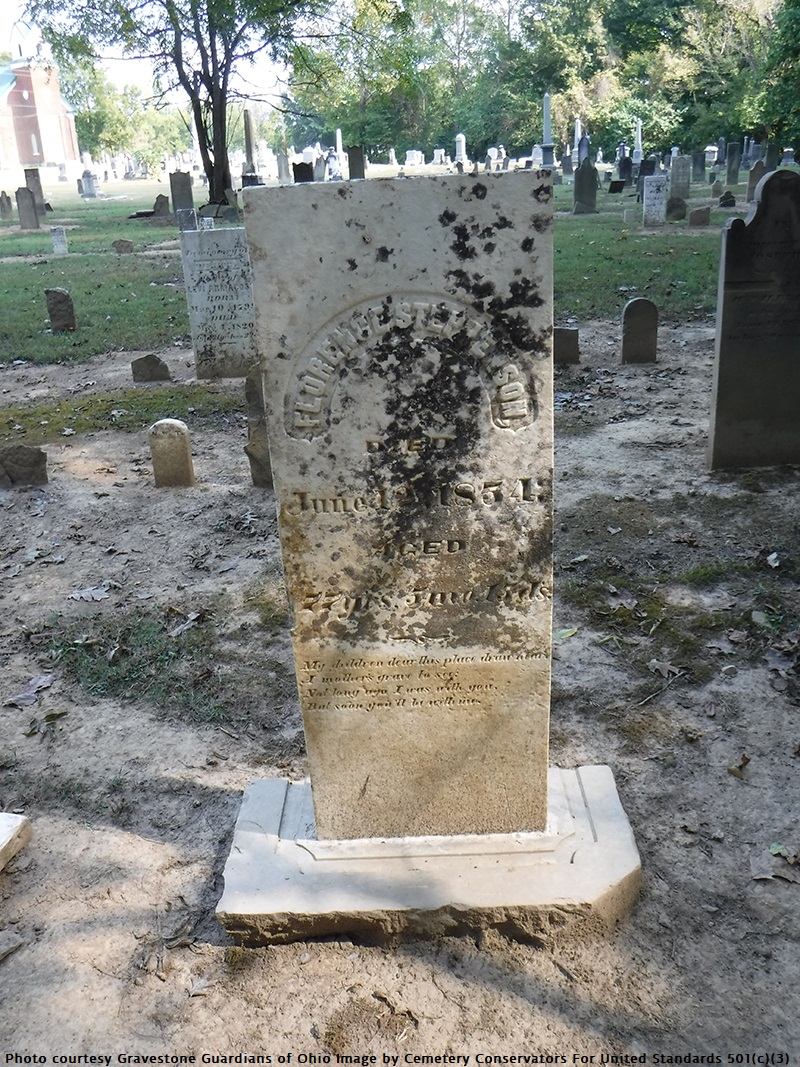
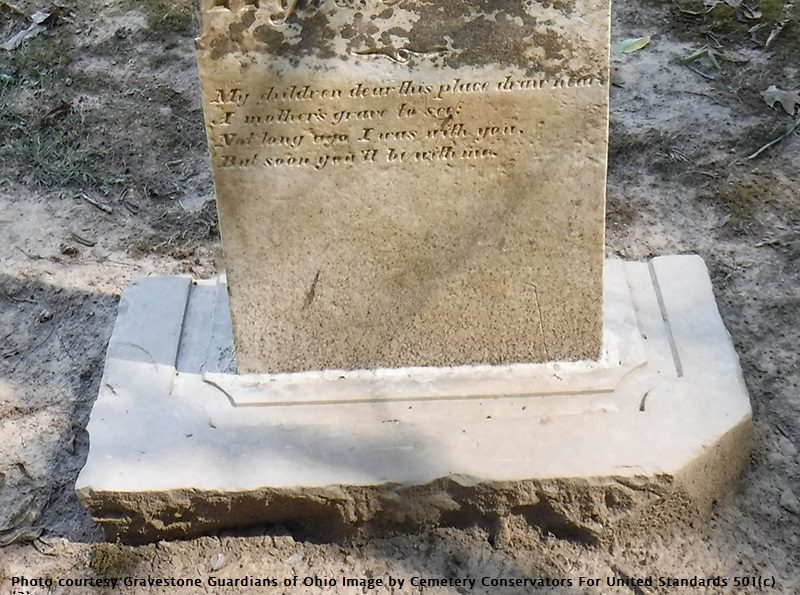
Here is an example of a “carver or stone masons mistake” as mentioned above. This stone has the appearance of once being slated for a building’s façade.
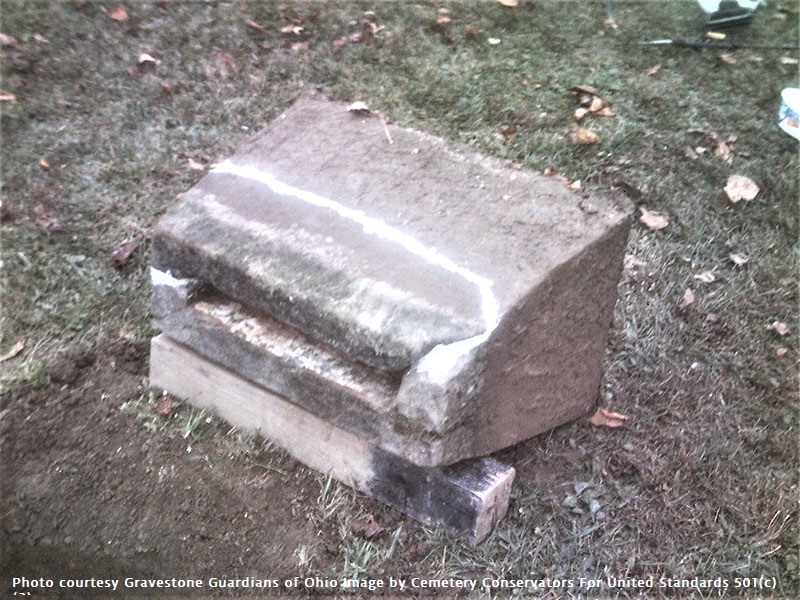
Repairing a broken slotted base can be a challenge at best. Many times they are shattered in lots of pieces making them impossible to reconnect with any durable strength. The sandstone base above was still very solid, with a clean break, and only a single break. Most original bases, if they are broken, break at the edge near the bottom of the carved slot. This is the weakest point of any slotted base. We put this 1 together with Casein Glue mortar because the clean single break really lent itself to trying this repair. It has been 4 years since this repair was made and the tablet mortared back in, and it is as solid as the day we put it together. This may not always hold true or be the case when it comes to trying to repair a base. Any repair made at the weakest point runs a risk of failure. This is just an example of a repair possibility and should only be attempted by someone with some experience that can best judge the particular situation.
Now let’s take a look at manufactured slotted bases. Let’s 1st start with a crude somewhat poorly made slotted base. The best and most important part of this construction was the making of a slot that allows the tablet to be mortared into place, instead of the much worse choice of placing it into wet concrete. But, it was a crude quickly made and poured concrete mix that will have a more limited lifespan. This particular base pour also has an uneven and lumpy bottom edge, making it very difficult to level. The goal is to always try to think about the longevity of any cemetery work performed. All such work will need some future maintenance at some point. So a stone with a rough lumpy bottom will make it much more difficult to relevel down the road. This can easily be remedied as you will see further down this page as we discus base molds.
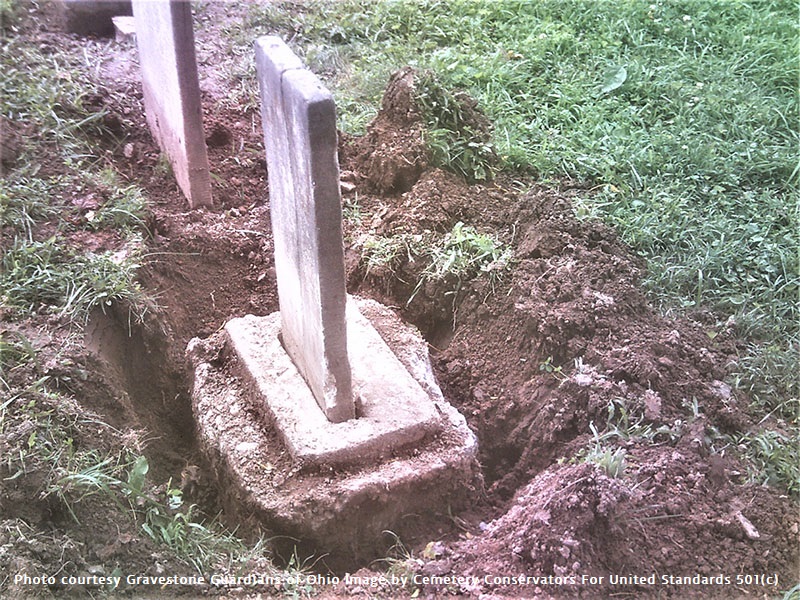
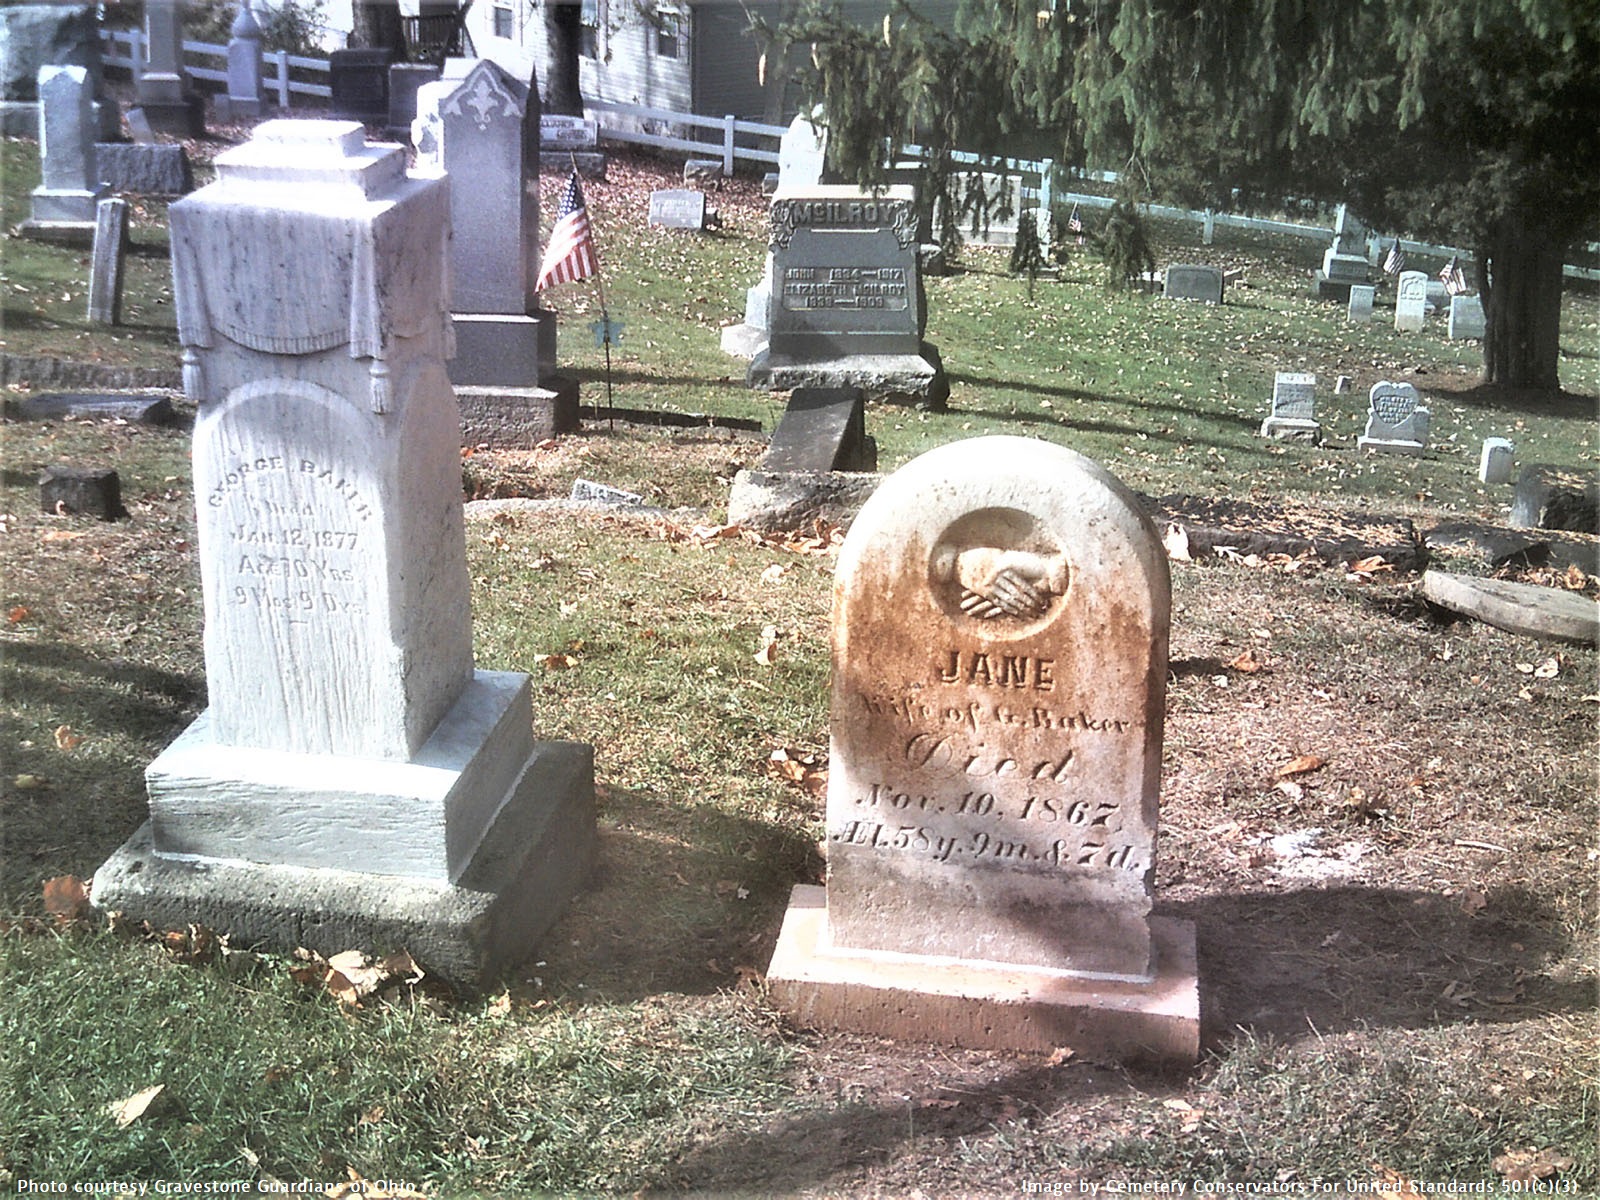
A new slotted base was needed for Jane Baker to complete the preservation of this couples plot. We cleaned, leveled and reset George Baker early in the season and took care of Jane at end of season. The orange coloring on her stone is because the D/2 biological cleaner is still at work. Today 4 years later, her stone is as white as her husbands is.
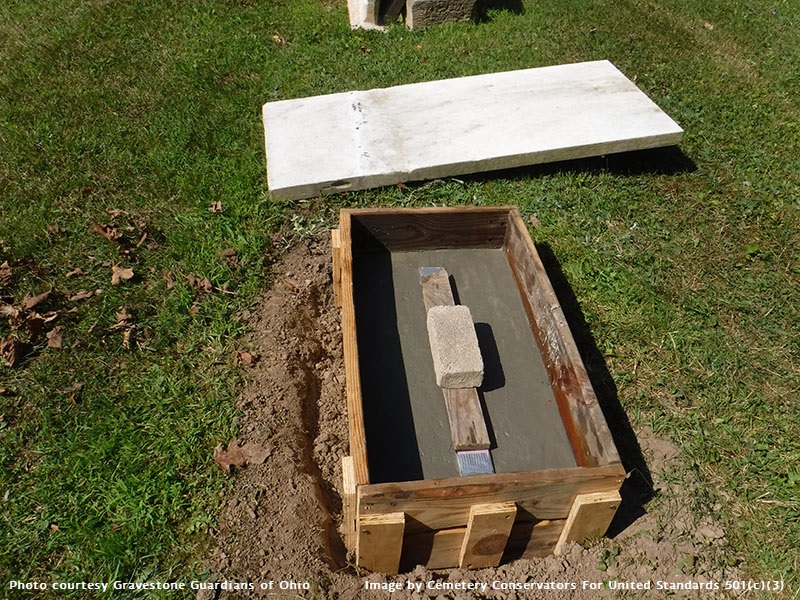
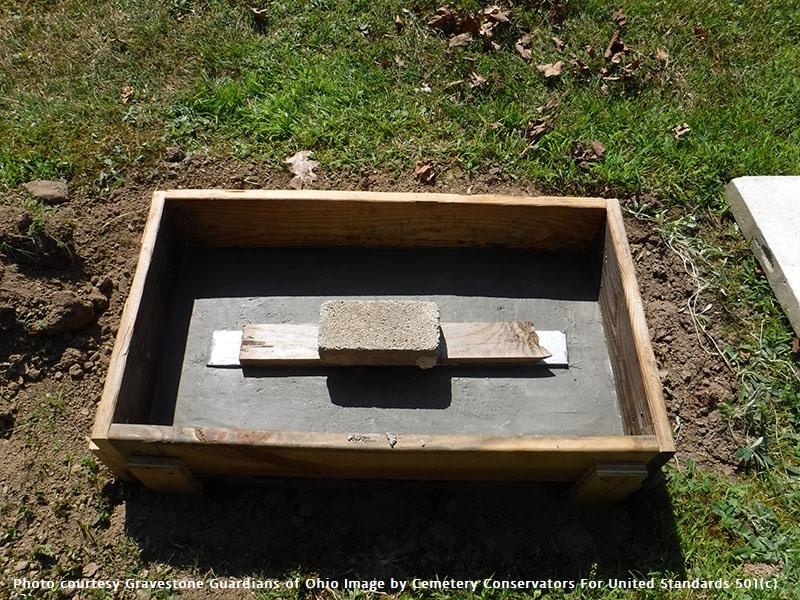
There are a number of ways to manufacture a slotted base. We’ll start with the simplest types of box molds that can be made from odd pieces of lumber. The box mold above was made with left over pieces of deck boards and scrap chunks of plywood to anchor the deck boards together and attach the sides to each other. What you see in the middle beneath the wood board and brick, is a piece of pink insulation foam board, cut to a slot size that will accommodate the tablet stone. This base was for a large tall marble tablet and thus required a large mold. This mold was approximately 30 inches long X 16 inches wide, and held 3 – 80 lb. bags of concrete equaling 240 lbs. total. The finished base height was approximately 1 ft. We’ll address height and width of box and amount of concrete used in accordance with size of tablet at the end of this section.
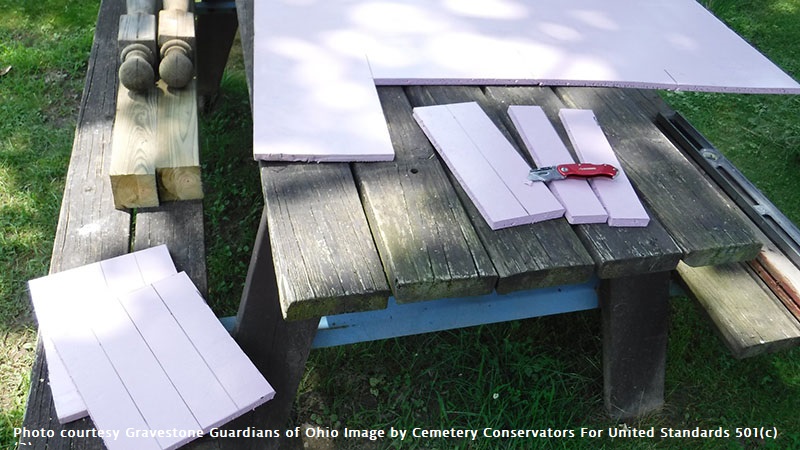
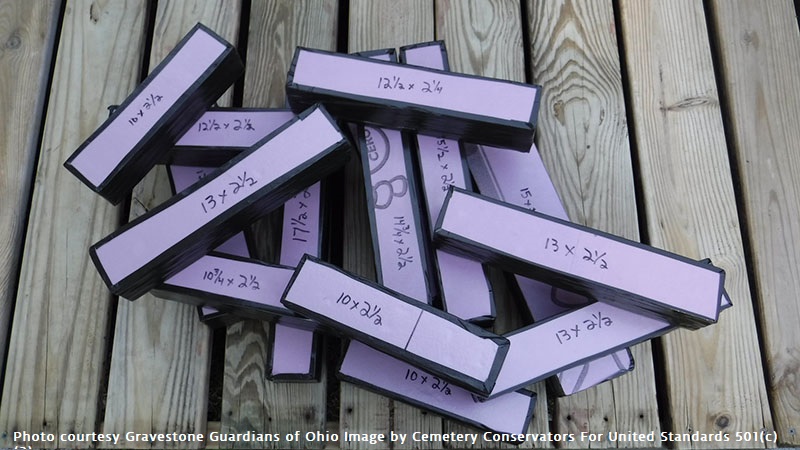
When it comes to making the mold for the slot, many conservators like using strips of pink insulation board. If you stack 4 strips, you reach about 2 inches of thickness or depth for your slot. 2 to 2 ½ inches is pretty standard for slot depths based on original base carvings. Stack them and wrap them with a good duct tape to hold them together. When it comes to making any slot mold, you should be at ¼ to ½ bigger all the way around, than the actual dimensional size of the tablet bottom. Make your slot molds accordingly. A cheap Crisco type of shortening can be used as “mold release” to separate the box mold from the concrete, as well as the foam slot mold from the concrete. This ensures easy removal of both after your concrete has set up for a day or 2. After working with the pink foam slot molds enough times, you will find they not only pop out easily, but you can reuse them several times. We will be putting together a video showing exactly what has just been described.
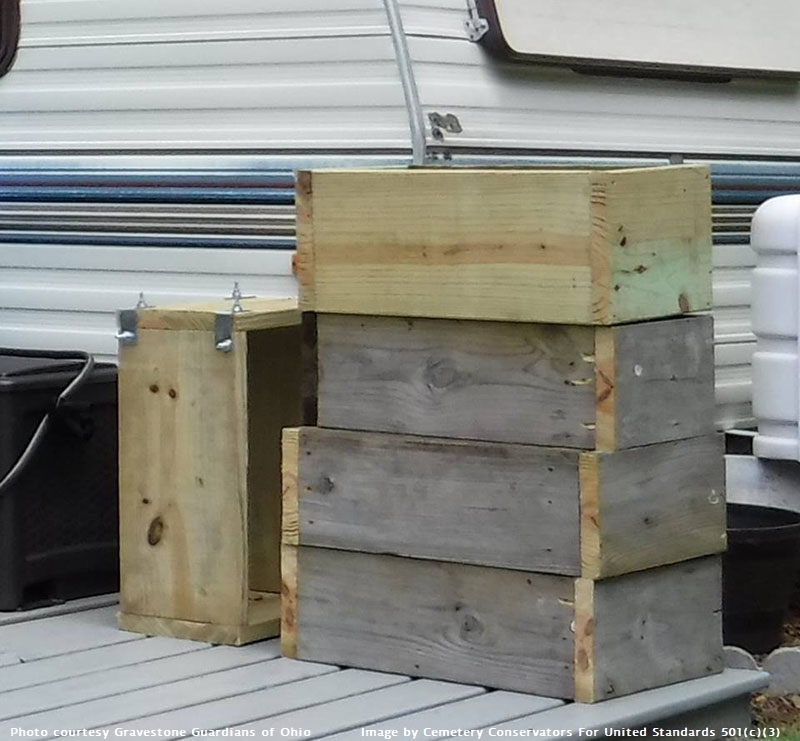
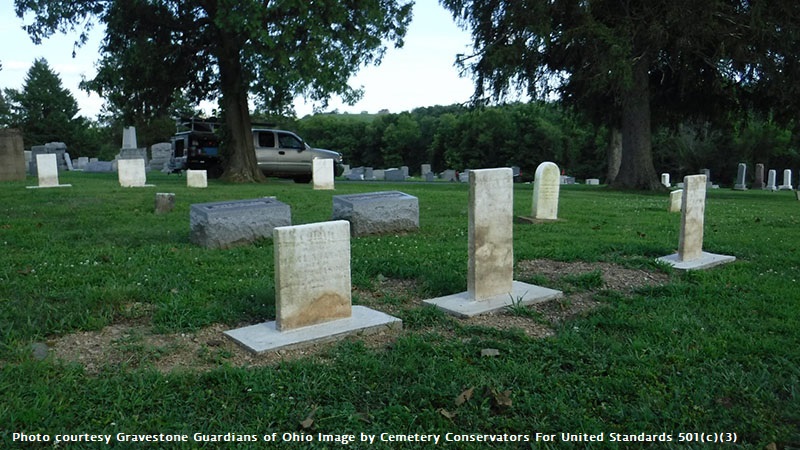
These are some molds simply made from treated 2 X 10’s and 2 X 12’s and the job they were used on. They are simply attached with 2 inch deck screws, making them easy to take apart and remove after the base is cured. These particular molds have no wooden bottoms and are just 4 sided frames more or less of a box. Not having a bottom will require a very nice level square hole to be dug out. This can become necessary when you start making 240 lb. bases that become hard to lift or maneuver. When possible…try to leave a few inches of the new base exposed above the ground. It is far better for a mower to damage a new base than the actual grave maker.
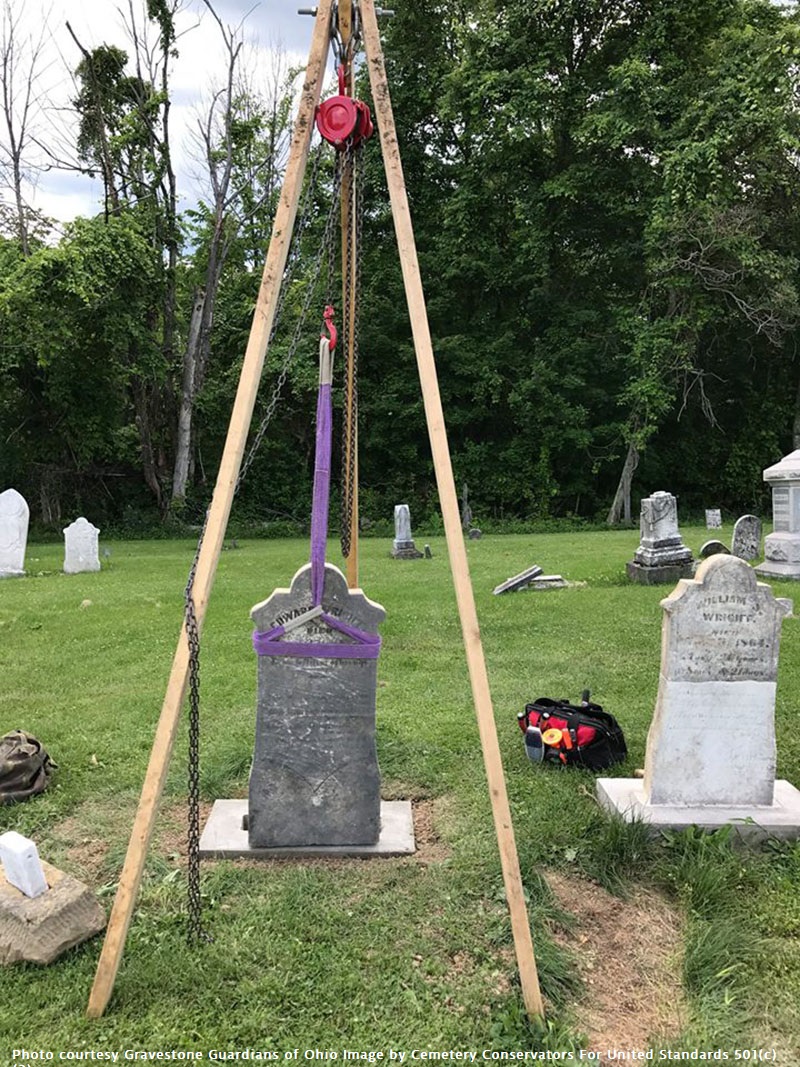

Above is an example of a 240 lb. plus base that was poured in the ground. Often the stones that go in these heavy bases, are heavy as well and require some assistance with a tripod to set them in place.
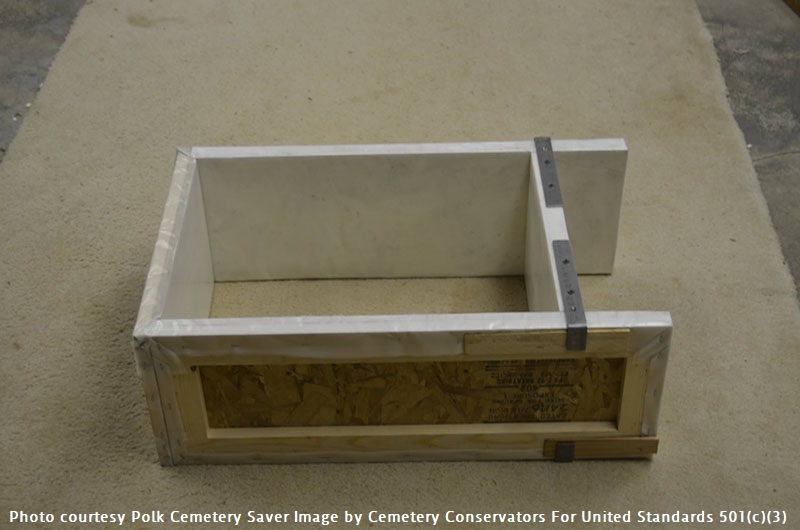
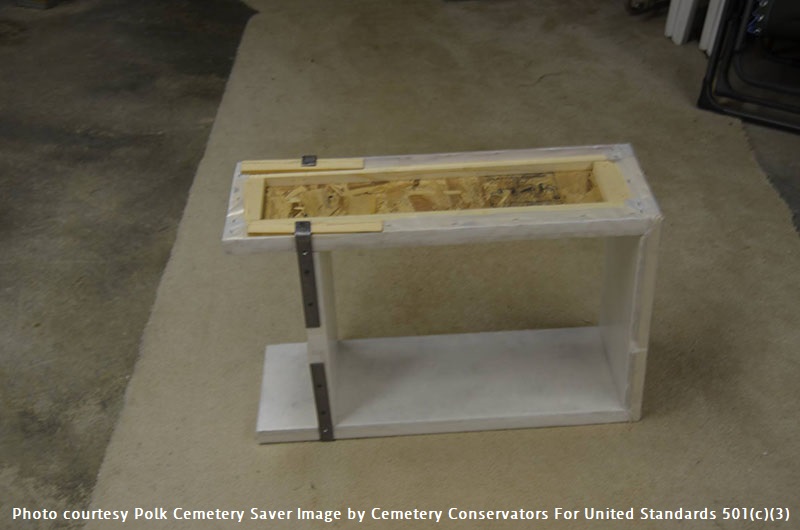
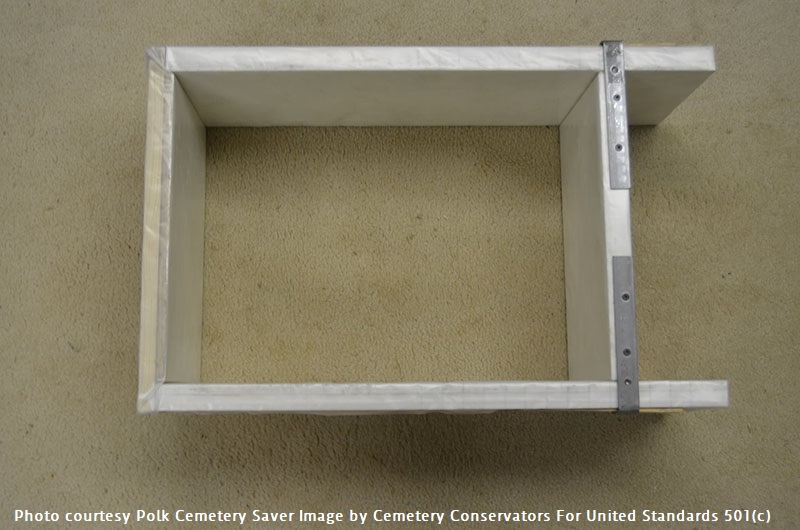
Above is an example of an adjustable box mold that allows you to lengthen the size of the finished base.
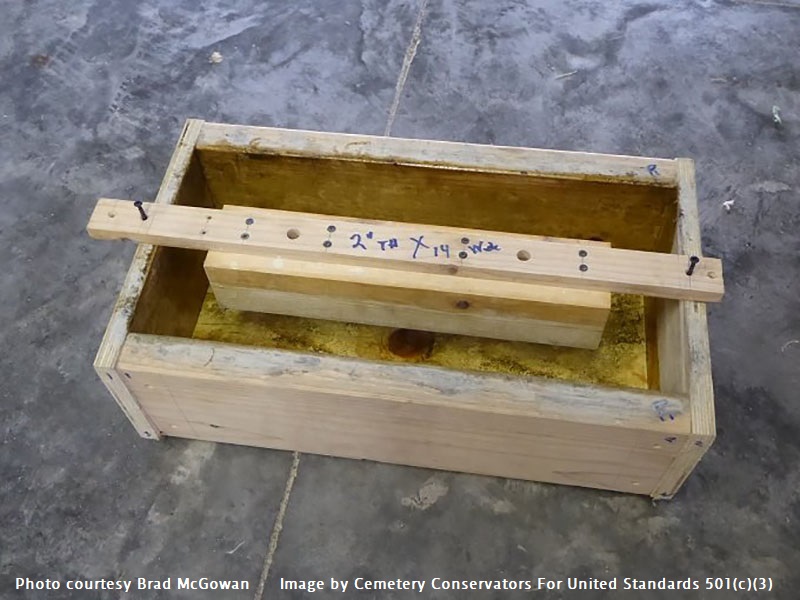
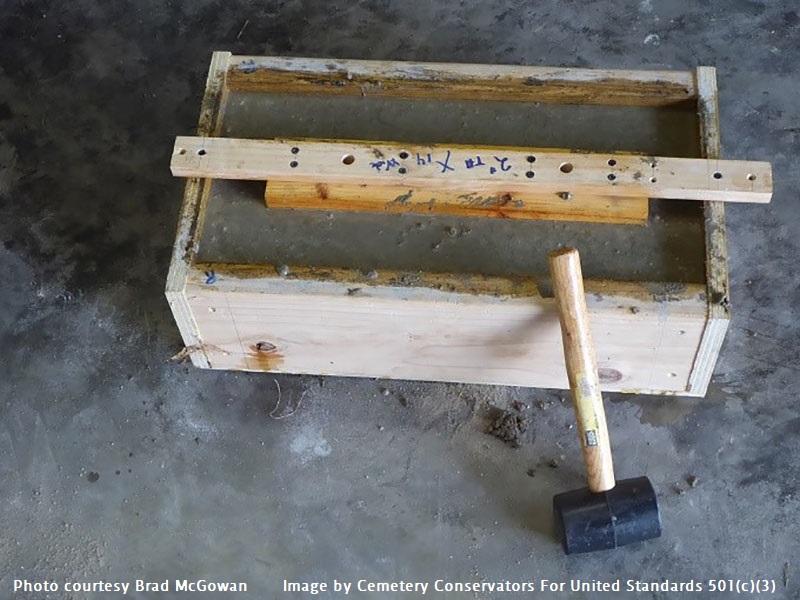
An example of a box mold with a bottom that makes it ideal for pre-casting bases off site at home. This mold has a wooden removable slot mold that anchors to the edge of the mold which allows it to stay level and in place.
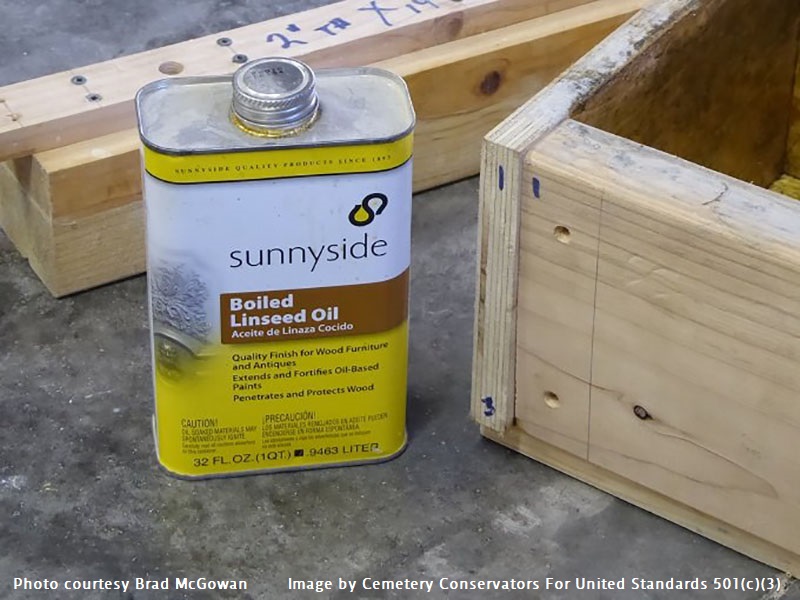
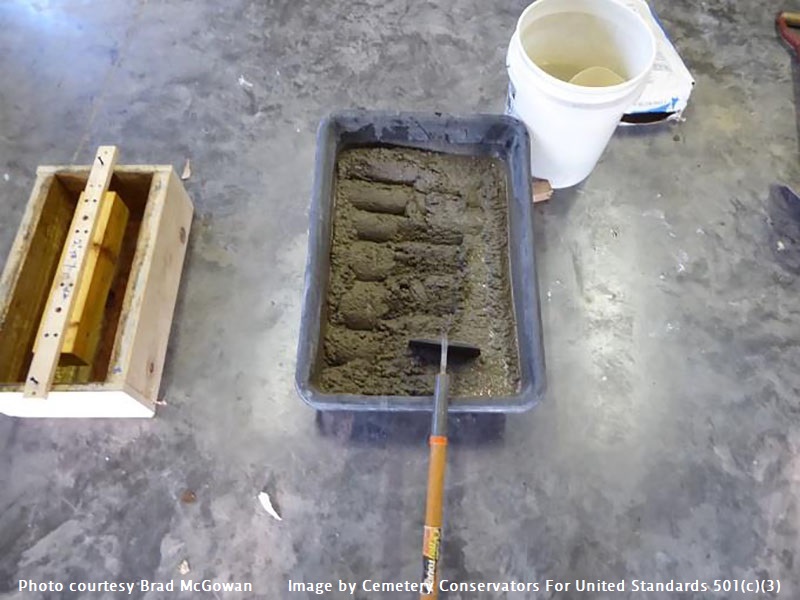
This conservator has chosen to use linseed oil as a mold release and has laid out all you need to manufacture this slotted base.
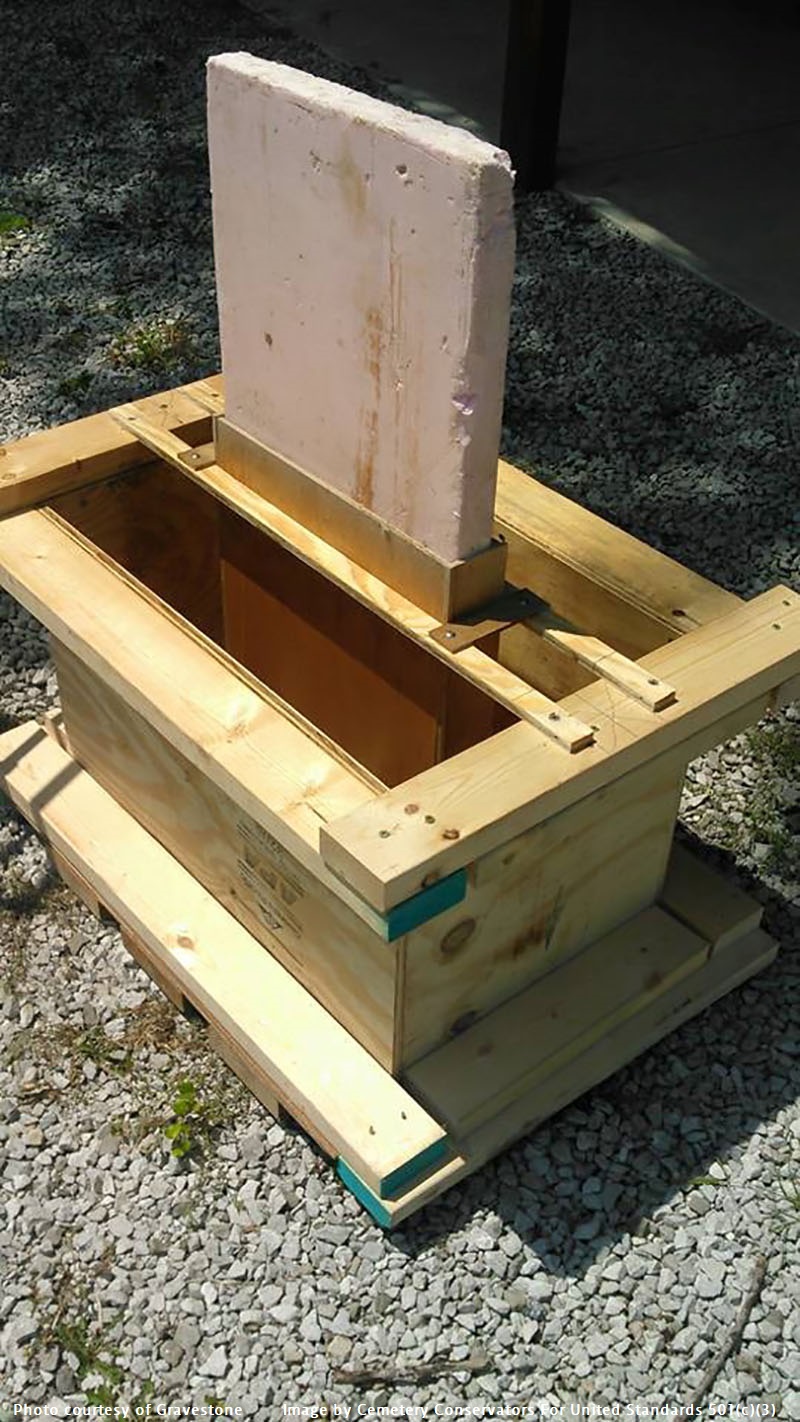
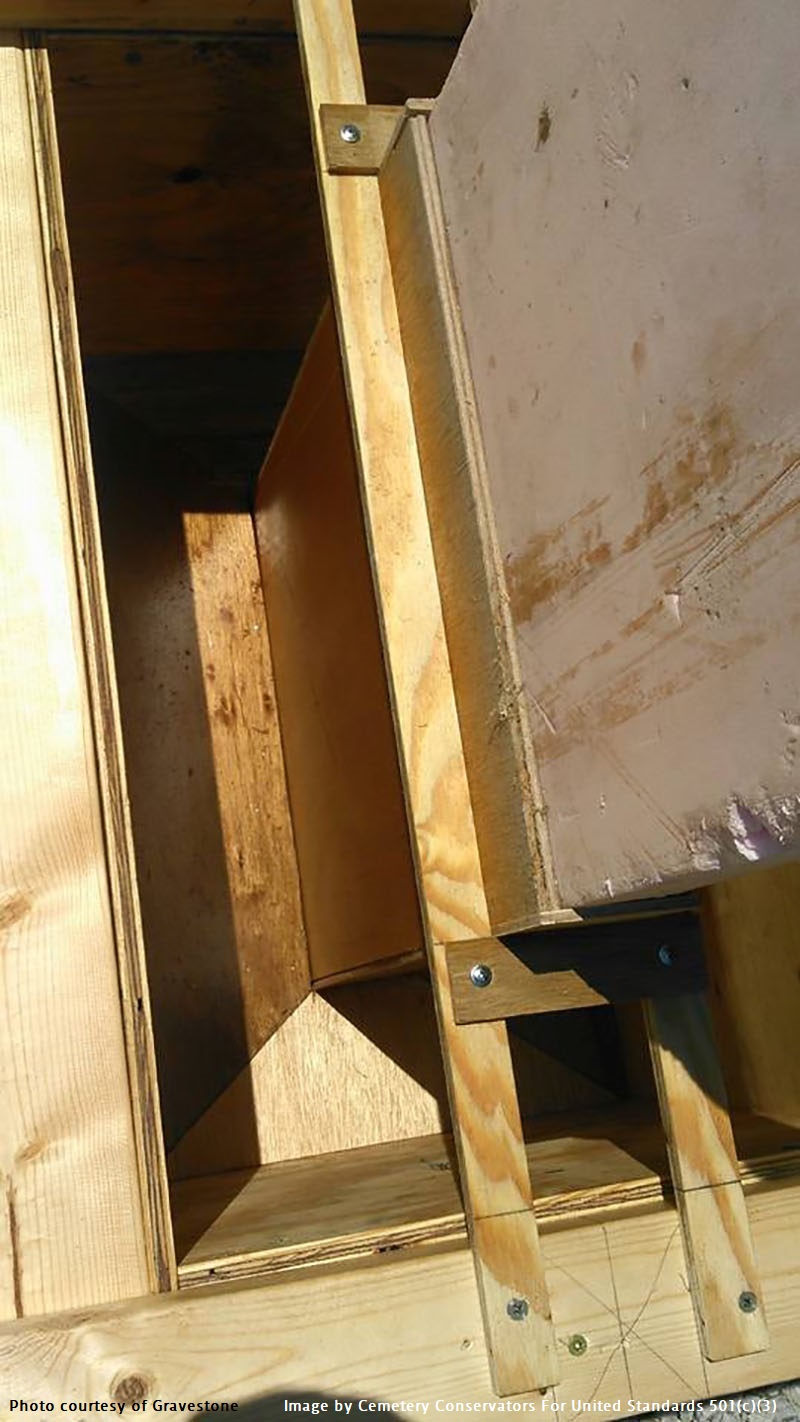
This rather more complex base mold is what many conservators are referring to as a “sleeve or collar” type base. It is ideal for resetting a tombstone that was originally a tablet set, but now due to a break or stone loss, cannot be tablet set again because the stone is too short to set by the rules of 3rd’s. “You can find out more about this rule of 3rd’s by visiting our section on tablet sets”. It also has a chamfered surface on 1 side for aesthetic effects. This is the bottom of the mold as you view it in the picture. When this base cures, you would simply flip the stone upside down making the chamfered side face up.
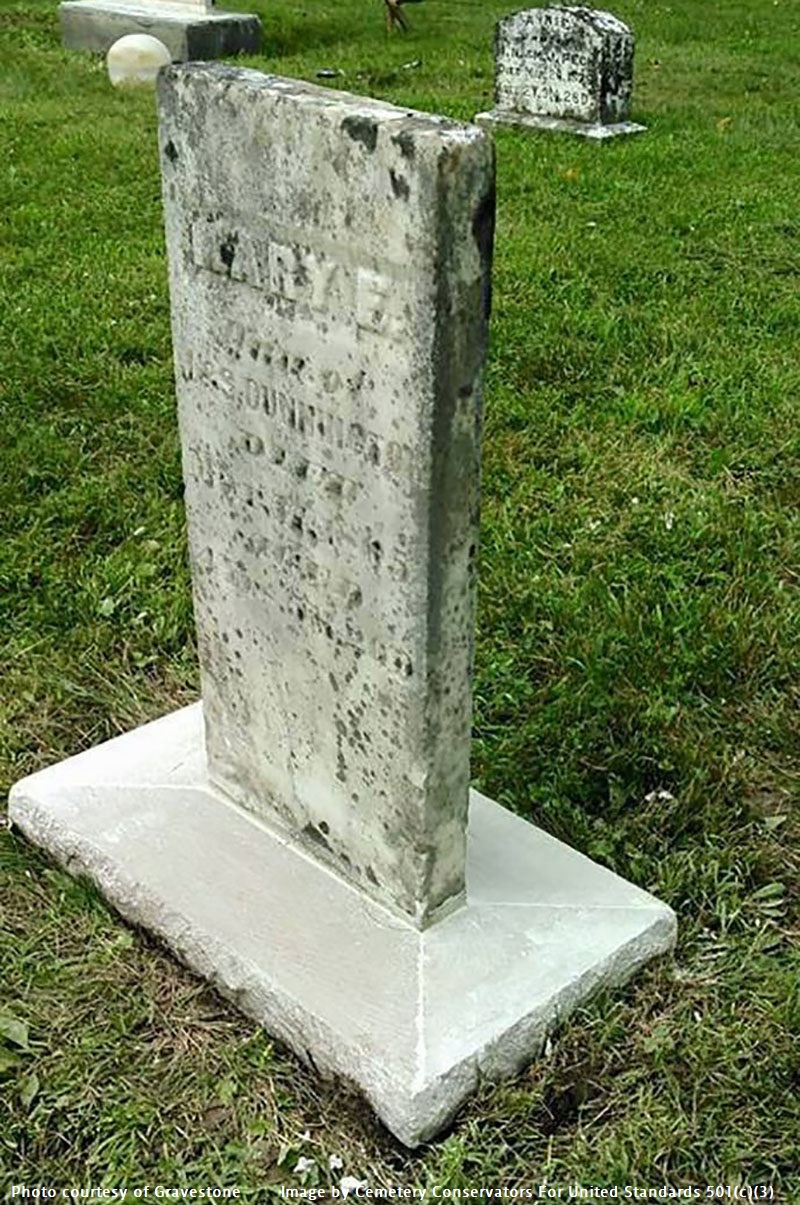
This is a hand carved replacement base made from limestone. Replacing a base this way is another option if you have stone carving skills or can find a carver. The chamfered design of this base was the inspiration for the base mold above.
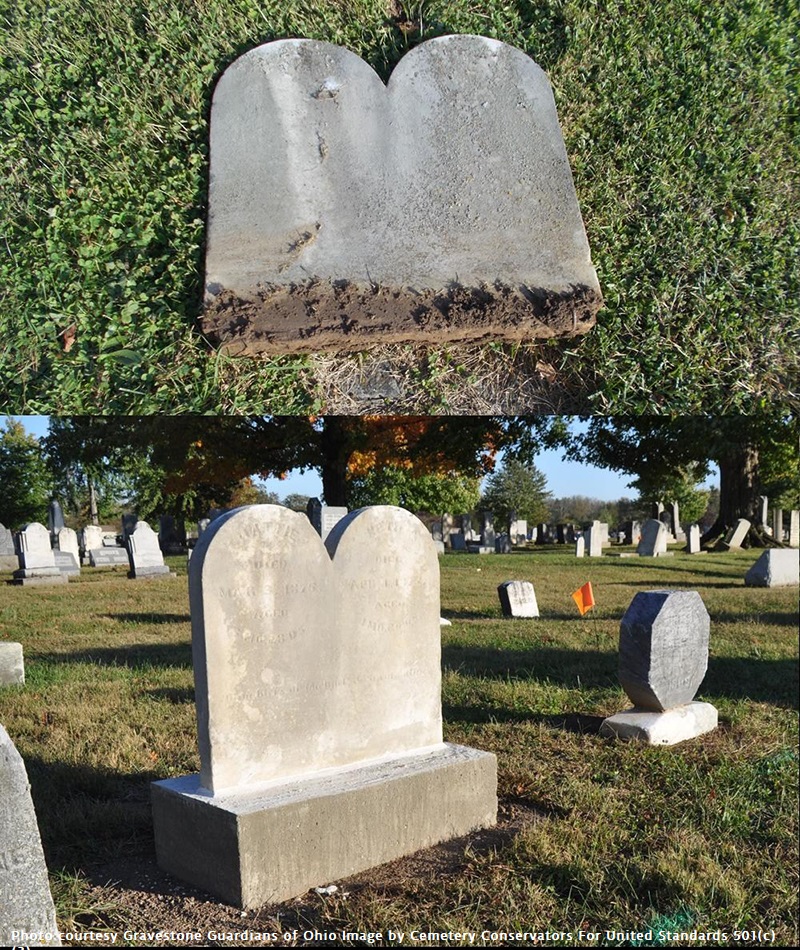
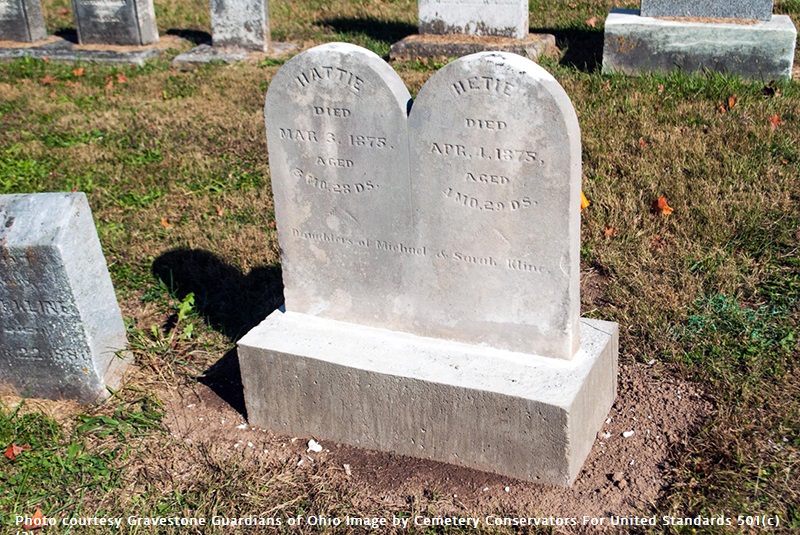
We will continue to add new molding methods as they are shared by our conservators and become available. With a little practice you will have no trouble choosing 1 of these methods and turning out solid well-made and good looking replacement base. Take your time and follow the procedures as laid out.
Below are some calculations from cemetery conservator Brad McGowan explaining his method for constructing base size in accordance with tablet size.
Slotted base form construction, the way I make mine, Readers Digest version. The form should be 7″ wider left to right and 7″ deeper front to back than the stone you are setting in it and a minimum of 6″ thick. So if your stone is 2″ thick the form should be 9″ wide front to back if your stone is 16″ wide then your form would measure 23″. The 6″ thickness is for a stone up to 42″ tall for every 6″: over that add 1/2″ depth to the thickness. The slot should be 1″ wider than your stone and 1″ thicker, per our example slot would be 3″ X 17″ X 3″deep. For every 8-12″ of measured height add 1/2″ to depth of slot. The form needs to have a release agent applied in this case boiled Linseed Oil brushed on the interior of the form, this keeps the concrete from sticking to the form and to the slot form. The two ½ bolts are to aid me in removing the slot form, as the concrete sets I gently rock the bolts creating a gap between the form and the concrete, do not get in a hurry to rock the bolts. I use Sacrete just follow the directions on the bag, I also use a mud box and a hoe to mix the concrete.
You can also find a detailed calculation for amounts or volume of concrete used for manufacturing bases according to mold size, under ARCHIVES…PDFs…INDEX…Base Manufacturing Calculations.
A short movie showing and explaining some of the methods used above will be coming soon and will be added to this website.
November 25, 2018 – CEMETERY CONSERVATORS FOR UNITED STANDARDS
