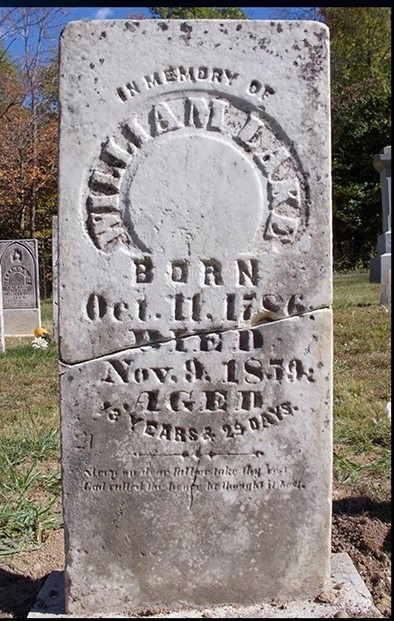
Infill is the process of filling in the gap that remains after a repair has been made to mend a stone. This final step helps to eliminate any open gaps that are left, that may allow excessive water build up that could cause an issue during a freeze/thaw cycle. Infill is a fine mortar that aids the stone in breathing and moisture transfer. In short, it helps to protect the repair that was just made. It is also your finishing touch concerning the aesthetics for the overall look of your final work. The most important part of this procedure is the materials or products used in your infill mix. Color matching is secondary and more a thing of pride in a job well done. Tweaking this to get the most seamless repair is practice, practice, practice. Most preservationists will tell you it’s their biggest challenge. Working at this is ideal for the meticulous person or someone with a history of crafts or finite hobbies. People of these backgrounds seem to thrive with this process. The important thing to remember is, it’s much less about an art contest, and much more about filling in the gap with a proper mortar. So don’t let any of this intimidate you. Be confident and move forward.

VOID FILL/INFILL
By CCUS member Lloyd Collins of Polk Cemetery Savers
This section is intended to describe the methods to fill in the gaps that are left after repairing the headstones with epoxy. This task is also not for impatient people. It takes time, skill, and a knowledge of materials and stone types. Infill color should match the cleaned stone as closely as possible. Since the material can dry up to two or three shades lighter than the wet mix, one should have test blocks with different color amounts per volume. Just attempting to guess the color will not give the results we strive for. In addition you may need different material for different types of stone, thus more color blocks. You must also have a mixture recipe for the different stone types.
After a headstone has been epoxied together, any epoxy that is in the crack that is not holding the stone together has to be removed. This can be done with a small wood chisel and a wooden mallet. This is a very hard task. The epoxy, when cured is brittle and chips like ice. You have to be very careful to remove the epoxy without damaging the stone. Having said that, infill material will not adhere to the hard epoxy, so the crack has to be cleaned so bare stone is available to adhere to the infill. If a chisel is not sufficient to remove the epoxy, you may have to resort to a dremel-like tool with a small diamond blade to scrape off the epoxy down to the stone. It must be done carefully and with small amounts at a time.
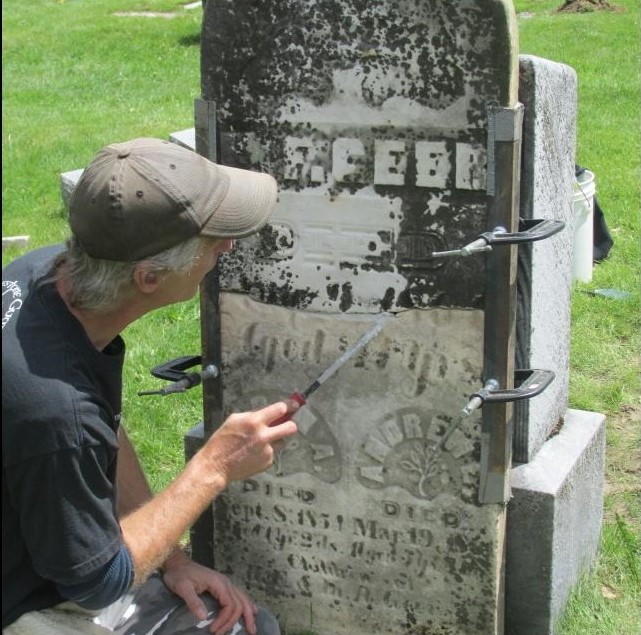
After the crack has been cleaned of epoxy, and the color block of correct material has been matched to the stone. It is time to mix a batch of infill material. Check the infill material list for recommended material.
After the material has been mixed, wet the crack with water. This will help the mix adhere to the stone. Using a wooden craft stick, carefully fill the void with the material. Since the material will tend to shrink slightly as it dries, ensure there is enough material to allow for shrinkage. Smooth the material as best as possible. After about two hours revisit the filled-in crack and smooth the material again. If there is engraving to be touched up through the infill material, allow the material to dry for about 12 hours. Using a #2 pencil, lightly pencil in the outline of the letters to be touched up. Using a pointed craft stick, lightly and carefully remove some of the infill so you can see and read the engraving. Let the mix dry for another 12 hours. Using a new craft stick, cut it to match the depth, angle and width of the original engraving. Carefully use this stick to etch out the fill material until the engraving appears similar to the original. You will never get it to match perfectly. In this case close is good. Touch up the infill as needed.
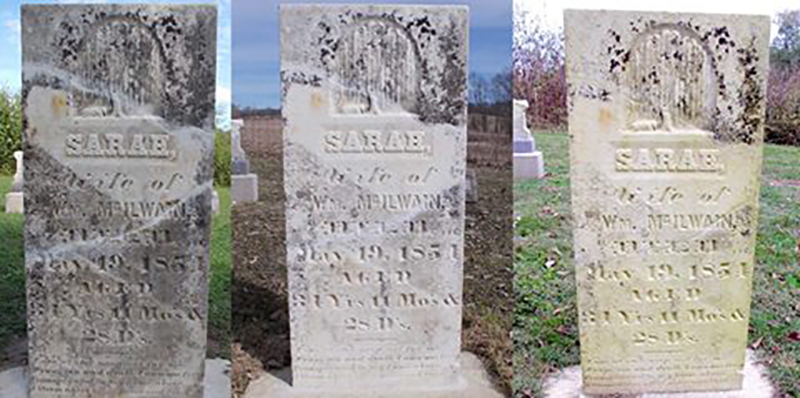
A time-lapse of a white marble tablet after infill as it slowly becomes cleaner with D/2 biological solution.
Noncommercial Infill Recipes And Techniques
Feathering Your Infill
By CCUS members Dave & Cindy Nicols Cemetery Preservationists
I used to be a cake decorator, so this is just second nature to me. It just takes a little patience and practice, but in the end, it may not be your cup of tea.
My husband, David, and I served on the Fayette County Cemetery Commission in Indiana for three years, and since the funds were low, we looked for affordable, yet approved methods for our repairs. When you repair a stone with an approved epoxy, make sure the mixture is back from the edges. If it goes to the edges, there won’t be anything for the mortar to adhere to. If this happens, you should take a fine chisel and chip the hardened epoxy away, being very careful not to chip away the stone. Then use water and a soft bristle brush to clear away any residue and powder.
When ready to infill, use a misting bottle and dampen the stone (not dripping wet) so the mortar will stick to it (mist more as you work if it starts getting dry). Using a small thin trowel, push the mortar into the cracks and voids, making sure to fill it in well. You should use gloves, but I like to ‘feel’ what I am doing so I don’t use them. I also tend to use my hands instead of the fine trowel to push the mortar in.
When the cracks and voids are filled to my satisfaction, I use my fingers to feel and make sure it is flush with the surface of the stone. Using a triangular makeup sponge, I get the sponge wet and then squeeze out the excess moisture and then draw it lightly across the mortar and stone, ‘feathering” the finished edge.
Make sure to clean up any ‘extra’ feathering on the stone using a clean makeup sponge. If you are working on a stone other than just white marble, you might want to press a little of the matching stone dust into the mortar after you smooth it with the sponge.
If there are parts of the engraving to be re-carved, I wait just a short while and then use bamboo crock pot pics, popsicle sticks or pottery tools to recreate the lettering/art.
Mortar Mix for Infill
1-2 parts White Portland Cement
4-5 parts Natural Hydraulic Lime (3.5)
7 parts Stone Dust (Marble, Limestone, Sandstone, etc. matching what you are infilling)
Add clean water a little at a time mixing well, you want it to be fairly thick to use.

A Midwestern Infill Recipe
¾ part…hydrated building lime type S
¼ part…White Portland cement
2 parts…white marble dust, course or fine depending on the size of void gap
Moisten the stone so it does not draw moisture from your mortar. Big voids need more than one lift to fill and will require small pieces. This mix will result in a finish that is bright white so…you need a very soft brush to take back a little surface mortar after it sets just a little. That will expose the aggregate and give you better color match immediately. You need to hydrate with mist often and cover. In dry weather a gunny sack works fairly well but you need not let it dry out. Protect and hydrate frequently with mist for 5 days. Hot dry weather is the worst and may take more. Cool 50’s and 40″s at night helps slow down the cure which is good. Proper masonry in exaggerated weather is a challenge. Ratios of mix change with that weather.
3.5 And white marble aggregate is a good summer mix but again one needs to baby it along. A tablet stone is bombarded by elements from all sides. Think of your wet thumb sticking in the air and how it reacts to the elements. A stone the same way. Comfortable mason is comfortable mortar.
A New England Infill Recipe
1 part NHL (3.5 or 5)
3 parts marble dust slurry (dried)
Not practical for everyone unless you have a wet saw. But if you do, the left over slurry when dried is a very fine marble dust powder
An Oregon Infill Recipe
However, recommended material used to infill headstones varies by State and National Organizations. Check your State and/or local requirements for their list of setting materials.
For instance, the material shown below is specified for use in Oregon.
Mortar for Filling Void Patch Mix
2 parts White Portland Cement (recommended ASTM C-150. Type 1)
4 parts Hydrated Lime (recommended ASTM 207, Type S)
7 parts Stone dust and grit
Clean water, use sparingly, mixture should be very stiff, Use different colors of powdered grout to color
the mortar mix for a decent color match
There is a commercial product available special ordered from Home Depot, that with added lime, closely matches Oregons’ recommendation. We have received permission to use this.
Quikrete White Glass Block Mortar Mix with 3 parts added hydrated lime. This type “S” mortar mixture consists of 2 parts White Portland Cement, 1 part lime and 9 parts fine white sand. (12 parts) By adding the extra lime, three extra parts, the mixture is very similar to the state recommended mix.
Mix ratio… add slightly less than1/2 cup of hydrated lime to two cups of the Quikrete mortar mix.
DECEMBER 31, 2017 – CEMETERY CONSERVATORS FOR UNITED STANDARDS